Table of Contents
What is Bright Field Microscope?
- The Brightfield Microscope, commonly referred to as the Compound Light Microscope, is a fundamental tool in the realms of Biology, Cellular Biology, and Microbiological Laboratory studies. This optical microscope harnesses light rays to generate a dark image juxtaposed against a luminous backdrop.
- The primary function of the bright-field microscope is to observe both fixed and live specimens. These specimens are typically stained with basic dyes, ensuring a stark contrast between the image and its background. The microscope’s design incorporates magnifying lenses, which are pivotal in transforming the specimen into an image that can be observed through the eyepiece.
- Therefore, the resultant image from bright-field microscopy showcases a colored specimen set against a light background. It’s essential to note that microorganisms inherently do not absorb light. However, post-staining, these organisms become capable of light absorption.
- The microscope’s optical components, specifically the condenser lens and the trajectory of light emanating from the illuminator, are instrumental in producing a bright-field image. This image is characterized by its heightened contrast and magnification. Typically, the bright-field microscope can magnify an image ranging from 1,000 X to 2,000 X. However, any magnification beyond 2,000 X compromises the clarity of the image, rendering it blurred or indistinct.
- In the realm of optical microscopy, bright-field microscopy stands out due to its simplicity in illumination techniques. The technique involves illuminating the background, contrasting it against a stained specimen. This method is prevalent in practical labs, aiding in the study of organismal attributes such as size, shape, and arrangement.
- Besides its primary function, the bright-field microscope employs either the critical or Koehler magnification or illumination system to enhance the image’s contrast. The former, critical illumination, is an archaic method where the condenser forms an unevenly illuminated image. In contrast, Koehler illumination, a more advanced technique, leverages additional optical systems to yield an evenly illuminated image.
- Then, it’s worth noting that bright-field microscopy (BF) is the most rudimentary among all optical microscopy illumination techniques. The sample is illuminated using transmitted white light. The contrast observed in the sample arises due to the attenuation of this transmitted light in the sample’s denser regions. The quintessential image produced by this method is a dark sample set against a bright backdrop, which is the origin of its name.
- Microscopy, as a technique, unveils objects that elude the naked eye. In biological contexts, it offers insights into microscopic entities like bacteria and cells, magnifying them up to 10,000 times their actual size. The bright-field microscope, a variant of light microscopy, primarily forms images through the absorption of light by the specimen.
- To elucidate further, a simple microscope is akin to a magnifying glass, employing a convex lens for image magnification. Conversely, a compound microscope utilizes at least two magnifying lenses or lens arrays, namely the objective and the eyepiece. This coordinated lens system is meticulously designed to offer a magnified view of the specimen, enhancing both its resolution and contrast.
- In conclusion, the bright-field microscope is an indispensable tool in scientific research, offering detailed and magnified views of specimens. Its design, functionality, and techniques ensure clear, concise, and objective observations, making it a cornerstone in biological studies.
Bright Field Microscope Definition
The Brightfield Microscope, often termed the Compound Light Microscope, is an optical instrument that utilizes light rays to produce a dark image against a bright background, primarily used in biological studies to observe stained specimens.
Principle of Brightfield Microscope
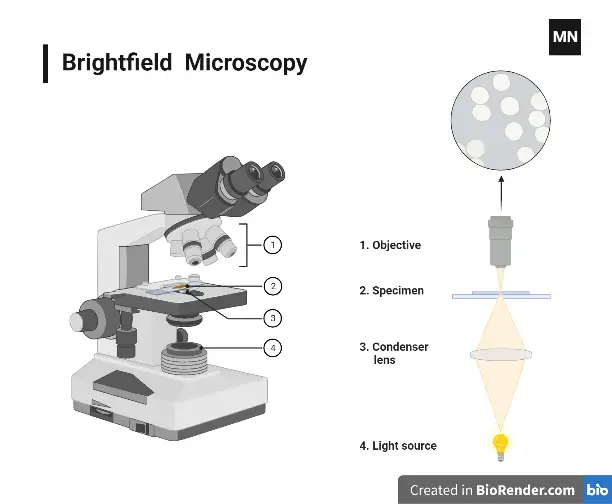
The Brightfield Microscope operates on a foundational principle that revolves around the transmission of light through a specimen. This microscope requires the specimen to be positioned in the path of a consistent beam of illuminating light. As the light traverses the specimen, certain regions absorb more light than others due to differential absorption and differential refraction. This variation in light absorption and refraction is what gives rise to the contrasting image that is observed.
To enhance the contrast and clarity of the image, specimens are typically subjected to a staining process. This staining imparts color to the specimens, thereby altering their refractive index. Therefore, when observed under the microscope, these colored specimens stand out distinctly against their surroundings. This distinction is achieved through a combination of both absorption and refractive contrast.
Furthermore, the microscope’s ability to deliver clear and detailed images is contingent on its capacity to produce high-resolution visuals. This is achieved by harnessing a potent light source that is meticulously focused on the specimen, ensuring the generation of images of superior quality.
Besides, when preparing a specimen for observation, it is placed on a microscopic slide. In certain instances, especially when aiming for higher magnification and clarity, the specimen might be viewed under oil immersion. Additionally, a coverslip is often placed atop the specimen. This setup not only keeps the specimen in place but also optimizes the path of the transmitted light, ensuring that the image produced is both sharp and detailed.
In conclusion, the principle of the Brightfield Microscope is rooted in its ability to utilize transmitted light to generate contrasted images of stained specimens. Through a combination of technical components and preparatory techniques, this microscope offers a clear, detailed, and objective view of the microscopic world.
Light Path of Brightfield Microscope
The Brightfield Microscope, a fundamental tool in biological studies, operates on a straightforward light path that is meticulously designed to produce clear and detailed images of specimens. This light path is pivotal in ensuring that the specimen is adequately illuminated and the resultant image is of optimal quality.
Initially, a stained specimen is positioned on the specimen stage, ensuring it is precisely placed for observation. Directly beneath the stage lies the condenser lens, which is equipped with an aperture diaphragm. The primary function of this condenser lens is to focus the light rays onto the specimen, ensuring it is uniformly illuminated.
As the light rays traverse the specimen, they undergo alterations. Specifically, certain regions of the specimen, especially those with stains, pigmentation, or denser areas, absorb some of these light rays. This differential absorption is crucial in generating the contrast observed in the final image.
Subsequent to passing through the specimen, these light rays are gathered by the objective lens situated above the stage. This lens plays a dual role. Firstly, it forms a magnified image of the specimen. Secondly, it transmits this magnified image to the eyepiece. Therefore, when an observer looks through the eyepiece, they witness a dark image set against a brightfield.
Besides the aforementioned components, the light path of the bright-field microscope is characterized by its simplicity. It encompasses:
- A transillumination light source, typically a halogen lamp, positioned in the microscope stand.
- The aforementioned condenser lens, which concentrates the light from the source onto the specimen.
- The objective lens, responsible for collecting light post its interaction with the specimen and magnifying the resultant image.
- Finally, oculars or a camera are employed to observe or capture the magnified image of the specimen.
In addition to the basic setup, bright-field microscopy can employ either critical or Köhler illumination techniques to enhance the illumination of the specimen. Both methods have their unique advantages and are chosen based on the specific requirements of the observation.
Types of Bright Field Microscope
- Compound Microscope: This is perhaps the most common type of brightfield microscope. The compound microscope employs multiple lenses to achieve its magnification. It is equipped with an objective lens, positioned proximate to the specimen, and an eyepiece lens near the observer. The dual-lens system allows for a detailed examination of minute samples, making it particularly suitable for observing cells, tissues, and microorganisms.
- Stereo Microscope: Distinct from the compound microscope, the stereo microscope utilizes two eyepieces, offering a three-dimensional perspective of the specimen. This depth perception is especially beneficial when examining larger or three-dimensional samples. Examples include plant parts or insects. Additionally, the stereo microscope’s design facilitates tasks that demand precision, such as dissections or intricate surgeries on a microscopic scale.
- Inverted Microscope: As the name suggests, the inverted microscope inverts the conventional design. Instead of viewing the specimen from above, the observation is made from below. This design is particularly advantageous when studying samples mounted on flat surfaces, like slides. It’s a preferred choice for researchers observing cells or tissues cultivated in labs or for specimens that pose challenges in traditional slide mounting.
- Polarizing Microscope: This specialized brightfield microscope is equipped with polarizing filters, enabling the study of a specimen’s optical properties. It’s a valuable tool for researchers examining materials with birefringence, a characteristic where the material alters the polarization of light passing through it. Common subjects for this microscope include minerals and crystals.
Parts of Brightfield Microscope
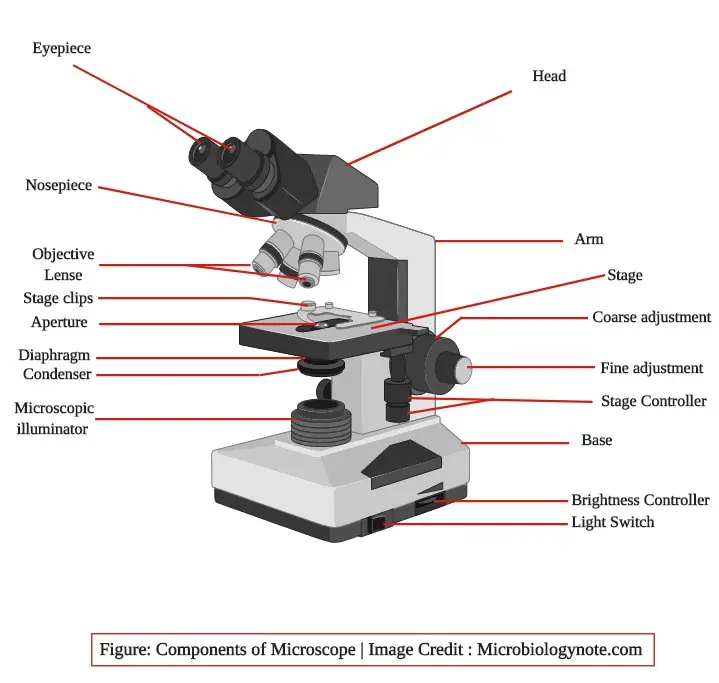
- Eyepiece (Ocular lens): Positioned at the microscope’s apex, the eyepiece contains lenses that further magnify the image formed by the objective lenses. It is through this component that observers view the magnified specimen.
- Objective Lenses: These are a set of lenses, usually ranging between two to five in number, each with varying magnification capabilities. They are mounted on a rotating mechanism called the nosepiece, allowing users to switch between different magnification levels seamlessly.
- Nosepiece: This rotating mechanism holds the objective lenses. By turning the nosepiece, users can select the desired objective lens for observation.
- Stage: Located beneath the objective lenses, the stage is a platform where the specimen, typically mounted on a slide, is placed for observation. The stage often has a transparent section, permitting light to pass through the specimen.
- Stage Clips: These are mechanisms on the stage that securely hold the specimen slide in place, ensuring it remains stationary during observation.
- Condenser: Positioned below the stage, the condenser focuses the light onto the specimen. It plays a pivotal role in illuminating the specimen uniformly, enhancing the image’s contrast.
- Diaphragm: This adjustable component, located beneath the condenser, regulates the amount of light reaching the specimen. By fine-tuning the diaphragm, users can optimize the contrast of the observed image.
- Illuminator: This is the microscope’s light source, typically situated at the base. It can be a halogen bulb or an LED lamp, providing the necessary illumination for the specimen.
- Focus Knobs: These are crucial for adjusting the focus of the microscope. There are typically two knobs: the coarse adjustment knob for major focus alterations and the fine adjustment knob for minute adjustments, ensuring a sharp and clear image.
- Arm: Serving as the microscope’s backbone, the arm provides support to both the optical and mechanical components. It is also the part by which the microscope is carried.
- Base: This is the microscope’s foundation, providing stability and housing the illuminator and other electrical components.
- Body Tube: This tube connects the eyepiece and the objective lenses, ensuring the correct optical path for the light.
- Light Intensity Control: This knob adjusts the illuminator’s brightness, allowing users to control the amount of light directed at the specimen.
- Stage Adjustment: This feature permits horizontal movement of the stage in the X and Y planes, facilitating the positioning of different specimen sections under the objective.
- Aperture Diaphragm (contrast): This component controls the light beam’s diameter passing through the condenser, influencing the image’s contrast.
| Parts of the Microscope | Function |
|---|---|
| Eyepiece (Ocular lens) | Magnifies the image formed by the objective lenses; where the observer views the specimen. |
| Objective Lenses | Provide primary magnification of the specimen. |
| Nosepiece | Rotating mechanism that holds the objective lenses. |
| Stage | Platform where the specimen is placed for observation. |
| Stage Clips | Hold the specimen slide in place on the stage. |
| Condenser | Focuses light onto the specimen to enhance image contrast. |
| Diaphragm | Regulates the amount of light reaching the specimen. |
| Illuminator | Provides the necessary light for the specimen. |
| Focus Knobs | Adjust the focus of the microscope; includes both coarse and fine adjustment knobs. |
| Arm | Provides support to the microscope and is used to carry it. |
| Base | Provides stability and houses the illuminator. |
| Body Tube | Connects the eyepiece and the objective lenses, ensuring the correct optical path for the light. |
| Light Intensity Control | Adjusts the brightness of the illuminator. |
| Stage Adjustment | Permits horizontal movement of the stage for positioning the specimen. |
| Aperture Diaphragm | Controls the diameter of the light beam, influencing image contrast. |
Magnification by Brightfield Microscope
Magnification in the realm of microscopy is a pivotal concept that determines the extent to which a specimen is enlarged for detailed observation. In the context of the Brightfield Microscope, magnification is achieved through a harmonious collaboration between two sets of lenses: the objective lenses and the eyepiece.
Objective Lenses: These are the primary lenses responsible for capturing and enlarging the image of the specimen. Positioned close to the specimen, they play a crucial role in forming an enlarged image, which is then relayed to the eyepiece. These lenses are designed to remain parfocal, ensuring that the image remains in focus even when there’s a switch between different objective lenses. Their magnification capabilities typically range from 40x to 1000x, depending on the specific type of Brightfield Microscope in use.
Eyepiece (Ocular Lens): Situated at the topmost part of the microscope, the eyepiece further magnifies the image relayed from the objective lenses. Standard eyepieces usually possess a magnification power of 10x, although variations can range from 8x to 12x.
To determine the total magnification achieved, one must consider both the magnification of the objective lens and that of the eyepiece. The formula for this is straightforward: Total Magnification = Magnification of the Objective Lens x Magnification of the Eyepiece
For instance, if an objective lens with a magnification of 45x is paired with an eyepiece of 10x magnification, the resulting total magnification would be 450x.
Another essential concept intertwined with magnification is resolution. Defined as the ability of a lens to distinguish between closely situated objects, resolution is a testament to the lens’s capability to reveal minute details. In the context of the Brightfield Microscope, the resolution is predominantly dependent on the objective lens.
In conclusion, the magnification achieved by a Brightfield Microscope is a product of the combined powers of the objective and eyepiece lenses. While the objective lens primarily determines the image’s enlargement and resolution, the eyepiece further magnifies this image, ensuring that observers can discern intricate details of the specimen with clarity and precision.
Operating Procedure of Brightfield Microscope (How to use Brightfield Microscope?)
Bright-field microscopy is a fundamental technique in the realm of microscopy, allowing scientists to view specimens with clarity and precision. The process involves several meticulous steps to ensure the specimen is adequately prepared and visualized. Here’s a detailed breakdown of the steps involved in bright-field microscopy:
- Preparation of Smear: The initial step involves preparing a smear on a glass slide. This is achieved by mixing the inoculum with a drop of distilled water. The thin film of the smear is subsequently heat-fixed and stained. Depending on the specimen, different staining techniques are employed. For instance, gram staining is utilized for bacterial identification, while lactophenol cotton blue stain is preferred for fungi.
- Optimization of Light: Once the slide is air-dried, oil immersion is applied to enhance resolution. The slide is then positioned on the microscope’s stage, secured with stage clips. Through the eyepiece, a preliminary observation is made to ascertain the specimen’s visibility.
- Adjustment of the Condenser Lens: For a magnified and clear image, the condenser lens is adjusted. This lens is pivotal in directing light from the illuminator onto the specimen. It’s crucial that the condenser lens is positioned close to the specimen for optimal results.
- Focus on the Specimen: A clear image is obtained by focusing on the specimen using the iris diaphragm, which regulates the diameter of light directed at the specimen. The diaphragm’s proximity to the condenser lens can influence the contrast and brightness of the image.
- Positioning of the Specimen: Post-focusing, the specimen’s position relative to the eyepiece is adjusted using stage controls. These controls, equipped with coarse and fine adjustment knobs, facilitate the stage’s movement in various directions, ensuring the image’s sharpness.
- Selection of Objective Lens: The distance between the eyepiece and the objective lens, termed separation distance, is adjusted. The objective revolver, which houses multiple objective lenses with varying magnification powers, is rotated to select the desired lens.
- Adjust the Illuminator: The light intensity emanating from the illuminator is modulated by adjusting the microscope’s mirror. This ensures the specimen is illuminated adequately.
- Working Principle: Bright-field microscopy operates on the principle of magnifying a dark specimen against a colorless background. The prepared slide is placed on the microscope stage, and light from the illuminator is directed at it. This light is focused onto the specimen by the condenser lens, aided by the aperture diaphragm. The objective lens captures the light reflected off the specimen, magnifying it before transmitting it to the ocular lens. During this process, some light rays are deflected or absorbed by the specimen, especially in stained or dense areas. Consequently, the specimen appears darker against a bright background, a characteristic feature of bright-field microscopy.
In conclusion, bright-field microscopy is a systematic process that requires careful preparation and precise adjustments to visualize specimens effectively. The technique’s ability to produce clear, magnified images of specimens against a bright background makes it an invaluable tool in various scientific disciplines.
How to Prepare Specimen (wet mount) for viewing with an upright compound microscope?
In the realm of microscopy, the clarity and quality of the specimen are paramount for accurate observation and analysis. When utilizing an upright compound microscope, the specimen’s preparation becomes a critical step, given that the light must traverse through the specimen for optimal visualization. This article elucidates the methodical process of preparing a wet mount, ensuring that the specimen is aptly positioned for microscopic examination.
- Selection of the Specimen: The specimen chosen for observation should ideally be minuscule, transparent, or thinly sectioned to facilitate the unhindered passage of light.
- Slide Preparation: Begin with a pristine glass slide, ensuring it is devoid of any contaminants or debris.
- Positioning the Specimen: Gently place the specimen at the slide’s center, ensuring it is evenly spread and free from folds or overlaps.
- Application of the Mounting Medium: Administer a judicious drop of the mounting medium, such as distilled water or glycerine, onto the specimen. This medium acts as a conduit for light and aids in the specimen’s preservation.
- Affixing the Coverslip: The coverslip serves a dual purpose – it safeguards the microscope’s lens from potential contamination from the mounting medium and exerts a slight pressure on the specimen, ensuring its flatness. To affix the coverslip, delicately lower one edge onto the slide, making contact with the mounting medium. Utilizing a pipette tip or a toothpick, gently support the opposite edge and methodically lower the coverslip, ensuring the entire specimen is covered. This technique aids in averting the entrapment of air bubbles.
- Excess Liquid Removal: Any surplus liquid surrounding the coverslip should be meticulously absorbed using a clean tissue to prevent any potential interference during observation.
- Staining the Specimen: Staining augments the contrast of the specimen, making intricate structures more discernible. Depending on the nature of the study, the specimen can either be pre-stained before mounting or the stain can be amalgamated with the mounting medium.
How to Prepare Specimen (wet mount) for viewing with an inverted compound microscope?
- Nature of the Inverted Microscope: Unlike traditional microscopes where the light source is above the specimen, the inverted microscope positions its light source below, with objectives situated above the specimen. This configuration is particularly advantageous for examining cells in culture dishes or flasks.
- Simplicity in Specimen Preparation: One of the salient features of the inverted microscope is the minimalistic specimen preparation required. Given its design, living cells can be directly observed in their native culture dishes or flasks without necessitating any transfer or mounting onto slides.
- Live-Cell Imaging: This technique is a cornerstone of inverted microscopy. It permits the real-time observation of various intracellular events, capturing the dynamism of cellular processes. The ability to monitor cells over extended periods provides invaluable data for cellular biology research.
- Fluorescent Labeling: To enhance the visibility of specific cellular structures or processes, fluorescent labeling is often employed in live-cell imaging. As highlighted by Murphy and Davidson (2012), this method allows for the selective illumination of targeted cellular components, making them easily distinguishable against the backdrop of the cell’s milieu.
Application of Brightfield Microscope
- Fundamental Biology: At the very core of biological studies, the Bright-field Microscope facilitates the observation of the development, organization, and function of both unicellular and multicellular organisms. It provides a window into the intricate structures and mechanisms that operate at cellular and subcellular levels.
- Cytogenetics: This branch of genetics is dedicated to the study of chromosomes. The Bright-field Microscope plays a pivotal role here, especially in observing metaphase chromosome spreads of various organisms, such as marine molluscs. The process involves a series of steps, from mitotic inhibition using colchicine to arrest cell division at the metaphase stage, to staining with Giemsa to highlight adenine-thymine rich areas of DNA. The end result is a detailed visualization of chromosomes at a magnification facilitated by the 100x objective lens.
- Microbiology and Bacteriology: The Bright-field Microscope is instrumental in visualizing and studying the morphologies of bacterial cells. Special staining techniques, such as Gram staining and Negative staining, are employed to enhance the contrast and visibility of these minute organisms.
- Parasitology: In the study of parasitic organisms, the Bright-field Microscope is used to identify and study protozoans like Paramecium.
- Cell Biology: The intricate structures within animal and plant cells can be meticulously observed using the Bright-field Microscope. From organelles to cellular processes, this tool offers a comprehensive view of the cellular world.
- Staining Techniques: The majority of specimens observed under the Bright-field Microscope are stained using specialized techniques to enhance their visibility. Techniques such as Negative staining and Gram staining are employed to provide contrast and detail to the specimens.
Advantages of Brightfield Microscope
- Simplicity in Operation: One of the primary advantages of the Bright-field Microscope is its user-friendly nature. It is straightforward to use, requiring minimal adjustments while viewing specimens. This simplicity ensures that even those with limited experience in microscopy can effectively utilize the instrument.
- Versatility in Viewing: The Bright-field Microscope is versatile in its application. It is adept at viewing both stained and unstained specimens, providing flexibility to the user based on the nature of the sample and the desired outcome of the observation.
- Authentic Color Representation: A significant benefit of this microscope is its optics, which do not alter or distort the natural color of the specimen. This ensures that the observations made are genuine and unaltered, providing an accurate representation of the sample.
- Modifiability for Enhanced Viewing: The design of the Bright-field Microscope allows for various modifications to enhance its functionality. For instance, it can be equipped with a camera to transform it into a digital microscope. This not only facilitates the capturing of images but also aids in detailed analysis and documentation.
- Adaptability to Darkfield Techniques: Another notable advantage is the microscope’s adaptability. With specific modifications, such as the use of fluorochromes on the specimen and adjustments in illumination, it can function as a darkfield microscope. This allows for viewing specimens under a dark environment, emphasizing the versatility of the Bright-field Microscope.
Disadvantages of Brightfield Microscope
- Contrast Limitations: One of the primary challenges with the Bright-field Microscope is its inherent low contrast. This limitation often necessitates the staining of specimens to enhance visibility. However, the use of the aperture diaphragm can sometimes introduce excessive contrast, potentially distorting the resultant image. Therefore, the iris diaphragm is often preferred to mitigate this issue.
- Restrictions on Live Specimens: The Bright-field Microscope is not suitable for observing live specimens, such as bacterial cells. It is primarily designed to view fixed specimens, which can be a significant limitation for certain biological studies.
- Magnification Constraints: While the microscope’s standard maximum magnification is 100x, modifications can extend this to 1000x. However, this is still the optimal magnification for observing bacterial cells, potentially limiting detailed observations.
- Staining Challenges: Staining, while enhancing visibility, introduces its own set of challenges. It can be a tedious process and might introduce extraneous details or even contaminate the specimen. Moreover, the necessity to stain specimens before observation can be time-consuming.
- Potential for Specimen Damage: The use of coverslips or oil immersion, while aiding in observation, carries the risk of damaging the specimen. Additionally, the microscope requires a potent light source for magnification. Sometimes, this light source can generate excessive heat, potentially harming or even killing the specimen.
- Resolution Concerns: The Bright-field Microscope has a relatively low apparent optical resolution, which can impact the clarity of the observed image.
- Limited Magnification: The microscope’s magnification capability is capped at around 1300x, which might not suffice for certain detailed observations.
Enhancements of Brightfield Microscope
The Bright-Field Microscope, a foundational tool in the realm of microscopy, has undergone various enhancements to improve its functionality and adapt to the evolving needs of scientific research. These enhancements aim to optimize the clarity, contrast, and resolution of the images produced, thereby offering more detailed and accurate observations.
- Iris Diaphragm Adjustments: One of the primary enhancements in the Bright-Field Microscope is the ability to adjust the iris diaphragm. By modulating the amount of light reaching the specimen, researchers can achieve optimal illumination. This adjustment can either increase or decrease the light source, allowing for better visualization of the specimen’s details.
- Oil Immersion Technique: For higher magnification observations, particularly under an objective lens of power 100X, the use of oil immersion becomes pivotal. By placing a special immersion oil on a glass cover over the specimen, one can achieve improved resolution. This is because the immersion oil possesses the same refraction properties as glass, ensuring that light rays are not refracted, leading to clearer images.
- Staining Methods: The inherent low contrast of the Bright-Field Microscope can be addressed using various staining methods. In microbiology, for instance, simple stains like methylene blue, safranin, and crystal violet can be employed. Additionally, differential stains, such as negative stains, flagellar stains, and endospore stains, can be used to differentiate and highlight specific structures or components of the specimen.
- Use of Filters: Another significant enhancement is the incorporation of colored or polarizing filters on the light source. These filters, especially when observing mineral samples, can accentuate certain features that might be indistinct under standard white light. For instance, a blue filter can help in highlighting specific structures or components, offering a more detailed view.

Difference between dark field and bright field Microscope
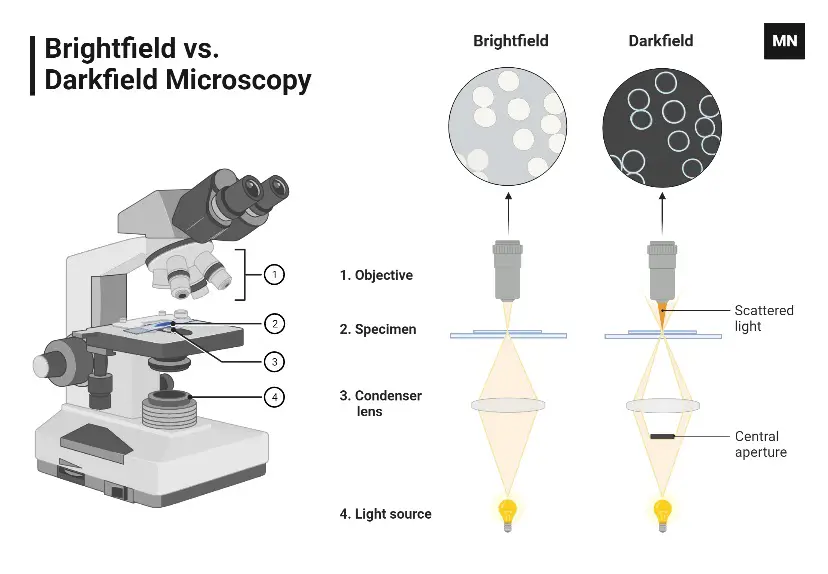
Bright-field microscopy and dark-field microscopy are both pivotal techniques in the realm of microscopy, each offering unique advantages for visualizing specimens. However, their methodologies and applications differ significantly. Here’s a detailed comparison between the two:
1. Principle of Operation:
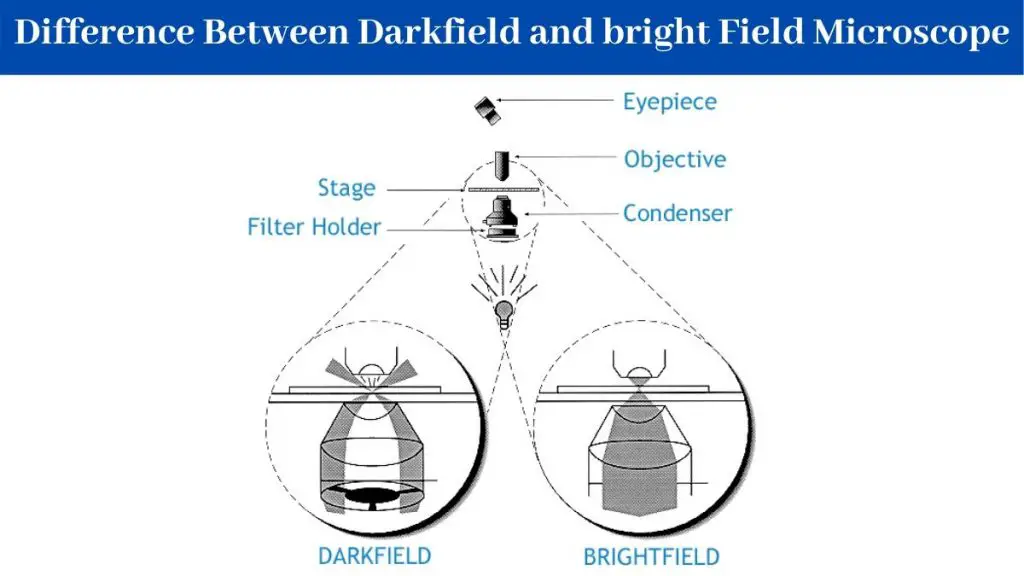
- Bright-field Microscopy: In this technique, light is transmitted directly through the specimen. The image is formed based on the light that either gets transmitted or scattered through the specimen. This results in a specimen that appears dark against a bright background.
- Dark-field Microscopy: Contrary to bright-field, this technique employs a specialized condenser to scatter light in such a way that it doesn’t directly illuminate the specimen. Instead, only the light scattered by the specimen enters the objective lens, producing a bright specimen against a dark background.
2. Suitability:
- Bright-field Microscopy: It is particularly effective for samples that absorb light efficiently. This includes specimens that have been stained using specific dyes, enhancing their visibility.
- Dark-field Microscopy: This method is ideal for visualizing transparent or low-contrast specimens that might not be easily discernible using bright-field microscopy. Examples include living cells, thin tissue slices, or organisms in a water drop.
3. Image Contrast:
- Bright-field Microscopy: The contrast in the image is derived from the inherent colors of the specimen or the dyes used to stain it. The background is typically bright, and the specimen appears darker.
- Dark-field Microscopy: The technique offers a high degree of contrast, especially for transparent specimens. The background is dark, and the specimen appears luminous.
4. Applications:
- Bright-field Microscopy: Commonly used in cellular biology to study cell structures, tissues, and to observe the morphology of bacterial cells. Staining techniques, such as Gram staining, are often employed to enhance visibility.
- Dark-field Microscopy: Widely used to study marine organisms, blood cells, and other transparent or unstained specimens. It’s especially valuable in detecting the presence of tiny particles, like bacteria, which would be challenging to see under bright-field conditions.
In conclusion, while both bright-field and dark-field microscopy are essential tools in scientific research, their applications and methodologies are distinct. The choice between them depends on the nature of the specimen and the specific details one aims to observe.
Quiz Practice
FAQ
Why is it called bright field microscope?
A bright field microscope is so named because it illuminates the specimen from below, causing the field of view to appear bright against a dark background. This type of microscope is the most basic and most commonly used, and it is suitable for examining transparent or semi-transparent specimens that are not naturally fluorescent. The light source is usually a lamp or an LED, and the specimen is placed on a transparent glass stage. The image is formed by light that is transmitted through the specimen and then focused by the objective lens and eyepiece. The brightness of the field depends on the intensity of the light source and the transparency of the specimen.
Which of the following can be examined with an ordinary bright-field microscope?
A. Wet mounts
B. Heat-fixed specimens
C. Chemical-fixed specimens
D. All of the choices are correct.
D. All of the choices are correct.
What is bright field microscope?
A bright field microscope is a type of optical microscope that uses visible light to create an image of a specimen. It is called a bright field microscope because the field of view appears bright against a dark background. This is achieved by illuminating the specimen from below and using a condenser lens to focus the light onto the specimen. The light is then transmitted through the specimen and focused by the objective lens and eyepiece, creating an image that can be viewed through the eyepieces or captured with a camera.
Bright field microscopes are the most basic and most commonly used type of microscope. They are suitable for examining transparent or semi-transparent specimens that are not naturally fluorescent, such as biological tissues, cells, and microorganisms. Bright field microscopes can be used to observe the morphological features of a specimen, such as its shape, size, and internal structure. They are widely used in research, education, and industry for a variety of applications, including biological research, pathology, and quality control.
How does a bright-field microscope form its image?
A bright field microscope forms its image by using visible light to illuminate the specimen from below and then focusing the transmitted light onto a viewing plane or detector. The light is first directed through a condenser lens, which focuses it onto the specimen. The light then passes through the specimen and is focused by the objective lens onto the eyepiece or camera detector.
The objective lens is a high-powered lens that is mounted on a rotating nosepiece, allowing the user to switch between different magnifications. The eyepiece, also known as the ocular lens, magnifies the image further and allows the user to view it. The eyepieces are usually mounted on a binocular or trinocular head, which allows the user to view the image through both eyes or through one eye while using a camera to capture the image.
The brightness of the field depends on the intensity of the light source, the transparency of the specimen, and the quality of the optics. The contrast of the image can be enhanced by using special stains or dyes to highlight specific features of the specimen.
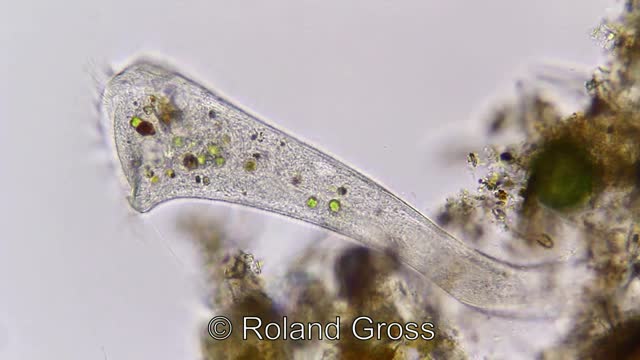
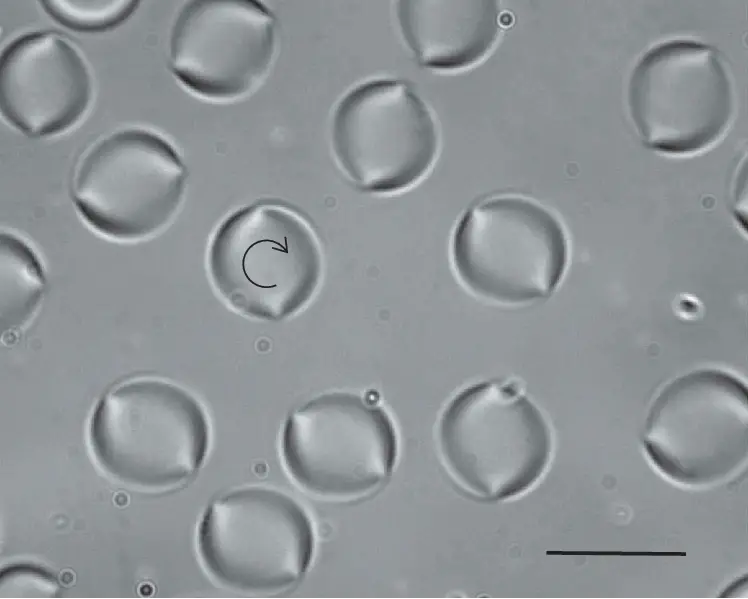
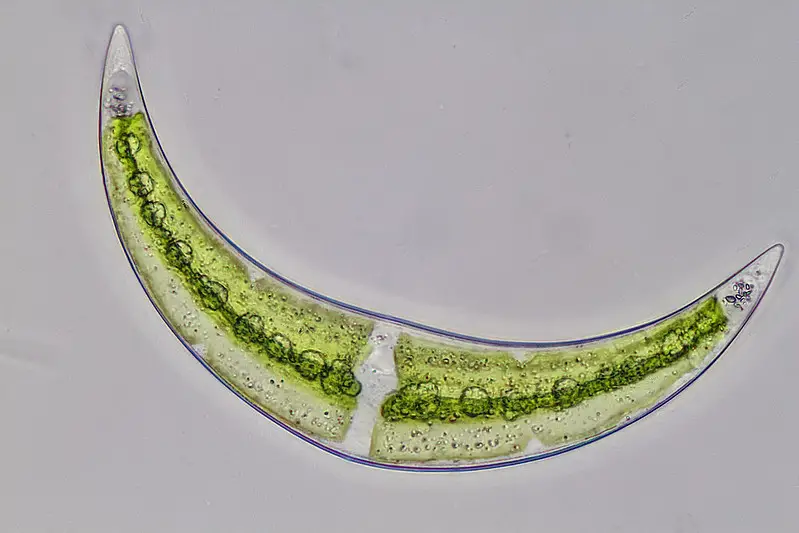
Bright Field microscope image
