Table of Contents
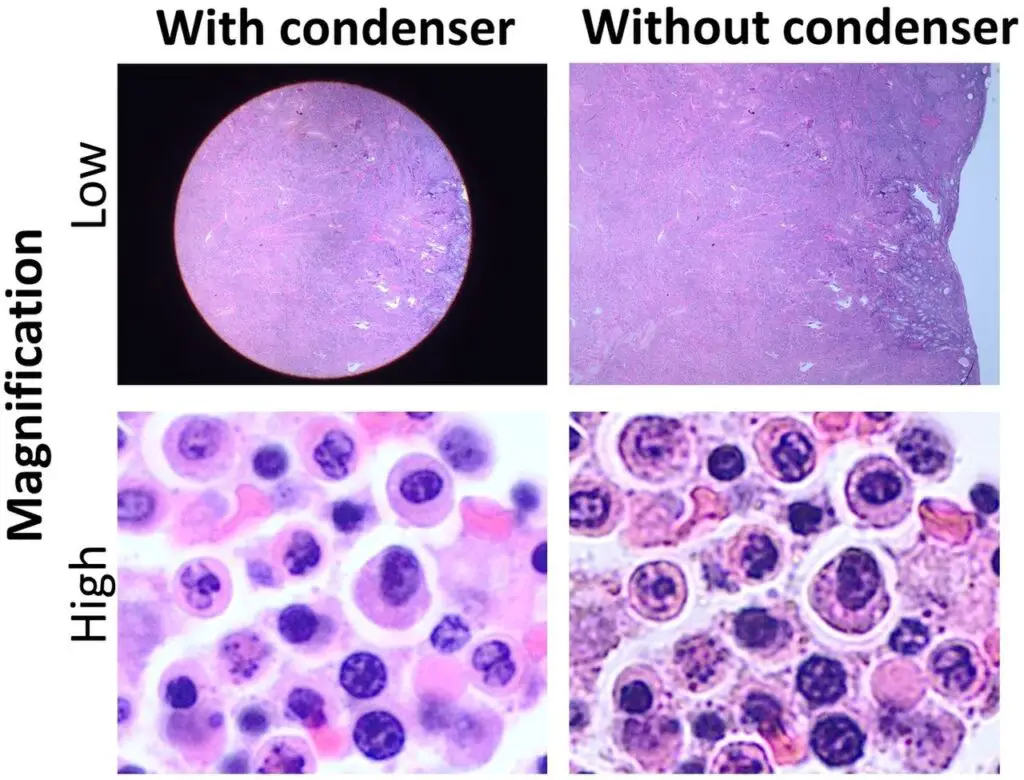
A microscope condenser is an integral optical component in the realm of microscopy, designed to focus and direct light onto the specimen being examined. This specialized lens system is strategically positioned beneath the microscope stage, a placement crucial for optimal illumination. The primary function of the condenser is to gather light from the microscope’s light source and concentrate it into a focused beam, thereby enhancing the visibility and clarity of the specimen. Its ability to control the intensity and angle of light plays a pivotal role in the quality of the microscopic image.
The construction of a microscope condenser typically involves a combination of lenses and a variable-aperture diaphragm. This configuration allows for precise adjustments in light concentration and distribution, catering to the specific requirements of different specimens and observation techniques. By adjusting the height and aperture of the condenser, users can optimize the lighting conditions, thereby improving the resolution and contrast of the image. The condenser’s capacity to reveal finer details makes it an essential component in achieving high-definition, detailed microscopic observations.
What is a Microscope Condenser?
- A microscope condenser is a vital optical element in microscopy, playing a crucial role in focusing and controlling light as it passes through a specimen. This component is fundamental in enhancing the clarity, contrast, and overall quality of the microscopic image.
- In a microscope setup, the condenser is strategically placed beneath the stage, where it serves to direct light onto the specimen. This precise placement is critical for ensuring that the light is optimally concentrated and aligned for the best possible illumination of the specimen. The condenser is equipped with adjustable settings, allowing for the manipulation of its height and aperture. These adjustments are essential for tailoring the lighting conditions to suit different specimens and microscopy techniques, thereby ensuring that the resulting images are as clear and detailed as possible.
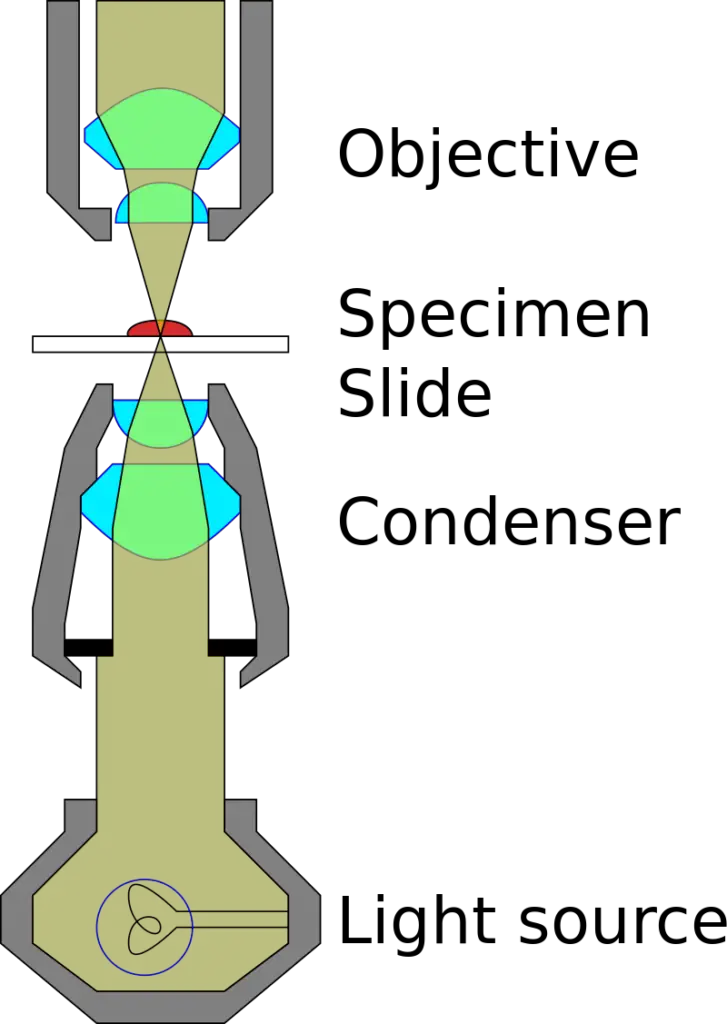
- The design of a microscope condenser typically includes one or more lenses, along with a variable-aperture diaphragm. The light sourced from the microscope’s illumination system first passes through this diaphragm. It is then focused by the lenses onto the specimen. After interacting with the specimen, this light diverges, forming an inverted cone that fills the front lens of the objective. This process is crucial for enhancing the resolution and contrast of the microscopic image, revealing finer details of the specimen under observation.


How Does a Condenser Work?
A condenser in a microscope works by concentrating and directing light onto the specimen being observed, playing a crucial role in the quality of the resulting image. Here’s a breakdown of how it functions:
- Light Concentration: The primary function of the condenser is to gather light from the microscope’s illumination source. This light source can be natural light, an LED, a halogen bulb, or any other form of light used in microscopy.
- Light Focusing: Once the light is gathered, the condenser focuses it into a cone of light that is directed onto the specimen. This is achieved through one or more lenses that make up the condenser. These lenses are designed to concentrate the light precisely on the plane of the specimen, ensuring that the light is uniformly distributed across the field of view.
- Adjusting Intensity and Angle: The condenser is equipped with an adjustable diaphragm, usually an iris diaphragm, which allows the user to control the diameter of the light beam. By adjusting the aperture of this diaphragm, the user can regulate the intensity and angle of the light that reaches the specimen. This adjustment is crucial for various microscopy techniques and for accommodating specimens of different thicknesses and opacities.
- Enhancing Image Quality: By focusing and adjusting the light, the condenser enhances several aspects of the image quality:
- Resolution: It improves the resolution of the image by providing sufficient light, which is essential for distinguishing fine details within the specimen.
- Contrast: It increases the contrast between different features of the specimen, making it easier to differentiate between various structures.
- Depth of Field: Proper adjustment of the condenser can also affect the depth of field, influencing how much of the specimen is in focus at one time.
- Compatibility with Objectives: The condenser must be adjusted according to the objective lens being used. Different objective lenses have different numerical apertures (NA), and for optimal performance, the NA of the condenser should be matched with that of the objective. This matching ensures that the light is appropriately focused and that the maximum amount of useful light enters the objective lens.

Structure of Microscope Condenser
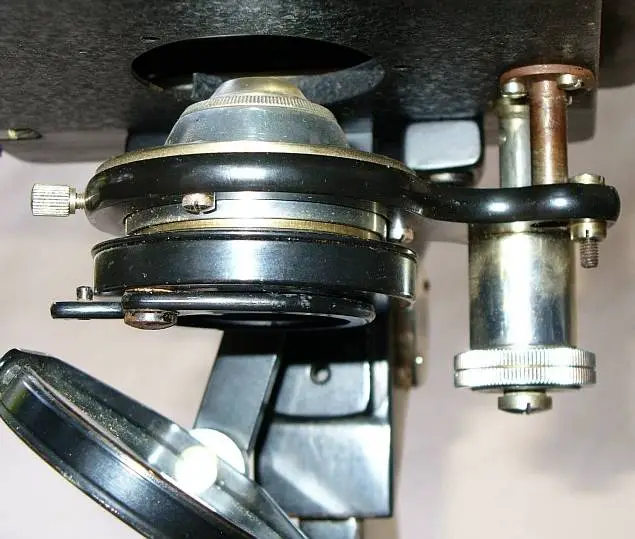
The structure of a microscope condenser is designed to effectively control and focus light onto the specimen being observed. Here are the key components and their functions:
- Lenses: The most critical part of the condenser is its lens or series of lenses. These lenses are responsible for concentrating and focusing the light onto the specimen. In some advanced condensers, there may be multiple lenses, each contributing to refining and directing the light more precisely.
- Diaphragm: Almost all microscope condensers come with a diaphragm, typically an iris diaphragm. This adjustable aperture controls the amount and angle of light that passes through the condenser. By adjusting the diaphragm, users can control the contrast and resolution of the image. In some cases, there might be additional diaphragms to further fine-tune the light.
- Mounting Mechanism: The condenser is mounted on a mechanism that allows for vertical adjustment, usually a rack and pinion gear system. This mechanism is crucial for adjusting the distance between the condenser and the specimen, allowing the user to focus the light optimally for different types of observations.
- Alignment Controls: Some advanced condensers may include controls for aligning the condenser lenses with the optical axis of the microscope. This alignment is essential for ensuring that the light is evenly distributed across the specimen.
- Filter Holder: Many condensers also have a slot or holder for filters. These filters can be used to alter the properties of the light, such as its color or intensity, which can be beneficial for specific types of microscopy techniques.
- Housing: The entire assembly of lenses, diaphragm, and other components is housed in a metal or plastic body. This housing is designed to fit into the microscope’s framework and align with the optical path of the microscope.
Types of Condensers
Microscope condensers are crucial components in microscopy, designed to focus and control the light that illuminates the specimen. There are several types of condensers, each with its unique features and applications:
- Abbe Condenser: Named after its inventor Ernst Abbe, this condenser, developed in 1870, is a standard in many light microscopes. The Abbe condenser is positioned below the stage and is instrumental in concentrating and controlling light before it passes through the specimen. It typically comprises two lenses: a plano-convex lens and a bi-convex lens, which work together to focus the light. The Abbe condenser is equipped with two controls: one for adjusting its distance from the stage, and another, an iris diaphragm, for regulating the light beam’s diameter. These adjustments help optimize brightness, illumination evenness, and contrast. However, the Abbe condenser is generally not suitable for magnifications above 400X due to its limited numerical aperture (NA) of 0.6.
- Aplanatic Condenser: This type of condenser is specifically designed to correct for spherical aberration in the concentrated light path. The correction enhances the focus and clarity of the light as it passes through the specimen, improving the overall quality of the microscopic image.
- Compound Achromatic Condenser: This condenser is corrected for both spherical and chromatic aberrations. The achromatic design allows it to produce clearer and more color-accurate images by reducing distortions and color fringes around the specimen.
Specialized Condensers:
- Dark Field and Phase Contrast Condensers: These are based on the designs of Abbe, aplanatic, or achromatic condensers but include additional elements like dark field stops or various size phase rings. These elements are housed in sliders or turret-type condensers, depending on the microscope’s design.
- Condensers for Differential Interference Contrast and Hoffman Modulation Contrast: These specialized condensers enhance contrast and visibility of transparent specimens.
- Epifluorescence Microscopy: In this setup, the objective lens doubles as a condenser for the incident light, focusing on the specimen illuminated by fluorescence.
The Arlow-Abbe Condenser is a notable variation of the traditional Abbe condenser, featuring a digital display unit that replaces the iris diaphragm and filter holder. This innovation, described by Dr. Jim Arlow, allows for digitally synthesized filters and dynamic illumination, broadening the scope of microscopic techniques.
Each type of microscope condenser offers specific advantages and is suited for different microscopy applications, making the choice of condenser an important consideration based on the requirements of the observation.


Numerical Apertures and Condensers
- Numerical apertures play a vital role in the performance of microscope condensers, which are systems made up of two lenses. These numerical apertures, often abbreviated as NA, are crucial factors that influence the quality and clarity of the images produced by microscopes.
- Combining different lenses with varying numerical apertures can be a challenge in microscope design. The key lies in matching these numerical apertures effectively. If your objective lens has a numerical aperture of 0.80, then your condenser should also be set to a numerical aperture of 0.80. This matching helps optimize the performance of the microscope system.
- Scientists and engineers strive to maximize the numerical aperture of lenses because it directly impacts the resolution and quality of the images. Techniques like oil immersion are frequently employed in condensers to enhance their numerical apertures and, consequently, the overall image resolution.
- For instance, consider using an oil immersion objective lens with a numerical aperture of 1.4. To align it with a condenser of numerical aperture 1.4, you need to apply oil not only to the objective lens but also to the top condenser lens situated between the condenser and the underside of the specimen slide. This additional step ensures that the numerical aperture is properly matched. If the oil is not applied, the highest achievable numerical aperture would be limited to 1.0.
- In summary, numerical apertures are critical factors in microscope condenser design. Achieving optimal performance involves aligning the numerical apertures of different lenses, and techniques like oil immersion are used to enhance these numerical apertures and improve the resolution of microscope images.

How to Use a Microscope Condenser?
Using a microscope condenser effectively is key to achieving high-quality microscopic images. Here’s a step-by-step guide on how to use a microscope condenser:
- Position the Condenser: Initially, ensure that the condenser is properly positioned. It should be mounted beneath the stage of the microscope. The condenser should be centered to align with the optical path of the microscope.
- Adjust the Height of the Condenser: Start by adjusting the height of the condenser. It should be close to the stage for high power objectives, and slightly lower for lower power objectives. The correct height optimizes the focus and intensity of light on the specimen.
- Set the Aperture Diaphragm: Adjust the aperture diaphragm (usually an iris diaphragm) located on the condenser. This diaphragm controls the diameter of the light beam. For most observations, the diaphragm should not be fully open; a slightly closed diaphragm can increase contrast and resolution. However, the optimal setting depends on the specimen and the objective lens in use.
- Adjust for Kohler Illumination (if applicable): If your microscope is capable of Kohler illumination, adjust the condenser and diaphragm to achieve this. Kohler illumination provides even and optimal lighting and is achieved by focusing the light source into the plane of the condenser aperture and then adjusting the diaphragm for the best contrast and resolution.
- Use Specialized Settings for Advanced Techniques (if applicable): If you are using specialized microscopy techniques like dark field, phase contrast, or differential interference contrast (DIC), the condenser might need additional settings or attachments. Follow the specific instructions for these techniques.
- Align the Condenser (if needed): Some advanced microscopes allow for the alignment of the condenser. Ensure that the condenser is centered and aligned with the optical axis of the microscope for the best lighting conditions.
- Regularly Check and Clean the Condenser: Keep the condenser clean for optimal performance. Dust and dirt on the condenser can affect the quality of the light and, consequently, the image.
- Experiment with Settings: Particularly for new users, it’s important to experiment with different settings of the condenser to understand how they affect the image. Try adjusting the height and diaphragm under different objectives to see the impact on image quality.
- Consult the Microscope Manual: Different microscopes might have specific instructions for using their condensers. Always refer to the microscope’s manual for detailed instructions tailored to your specific model.
- Practice and Patience: Achieving the perfect illumination and image quality takes practice and patience. Don’t hesitate to adjust and readjust until you find the settings that work best for your specific application.
How to Maintain and Care Microscope Condenser?
- Regular Cleaning: Dust, oil, and other contaminants can accumulate on the condenser lenses, affecting the quality of the light passing through. Use a soft, lint-free cloth or lens paper moistened with a mild, non-abrasive cleaning solution (like isopropyl alcohol or a lens-cleaning solution) to gently wipe the lenses. Avoid using excessive force which could scratch the lenses.
- Avoiding Contact with Harsh Chemicals: Harsh chemicals can damage the lens coatings. Ensure that the condenser is not exposed to aggressive solvents or corrosive substances.
- Proper Handling: Always handle the condenser gently. Abrupt movements or impacts can misalign the lenses or damage its mechanical parts. When inserting or removing the condenser, do so carefully and ensure it is securely fastened in its position.
- Adjustment Mechanism Care: The adjustment mechanisms, such as the focus knobs or diaphragm control, should be operated smoothly without force. If they become stiff or hard to move, consult the microscope’s manual or a professional technician for guidance on lubrication or servicing.
- Controlling Environmental Factors: Store the microscope in a clean, dry environment. Excessive humidity can promote fungal growth on the lenses, and dust can accumulate and interfere with the optical quality.
- Regular Inspection: Periodically inspect the condenser for signs of wear, misalignment, or damage. Early detection of issues can prevent more serious problems down the line.
- Covering the Microscope: When not in use, cover the microscope with a dust cover to protect it from airborne particles.
- Professional Servicing: For advanced issues like internal lens cleaning, realignment, or repairs, it’s advisable to seek professional servicing. Attempting to disassemble the condenser or microscope can cause further damage if not done by an expert.
- Avoiding DIY Repairs: Unless you have the required expertise and tools, avoid attempting to repair or adjust the internal components of the condenser. Incorrect handling can lead to misalignment or damage.
- Educating Users: If the microscope is used by multiple people, such as in a lab or educational setting, ensure that all users are informed about the proper use and care of the microscope and its condenser.
Functions of Microscope Condenser
Microscope condensers are essential components in microscopy, primarily serving to manipulate and optimize the light that illuminates the specimen. Here are the key functions of condensers:
- Focusing Light onto the Specimen: The primary function of a microscope condenser is to focus the light from the microscope’s light source onto the specimen. This focused beam of light is essential for clear and bright imaging.
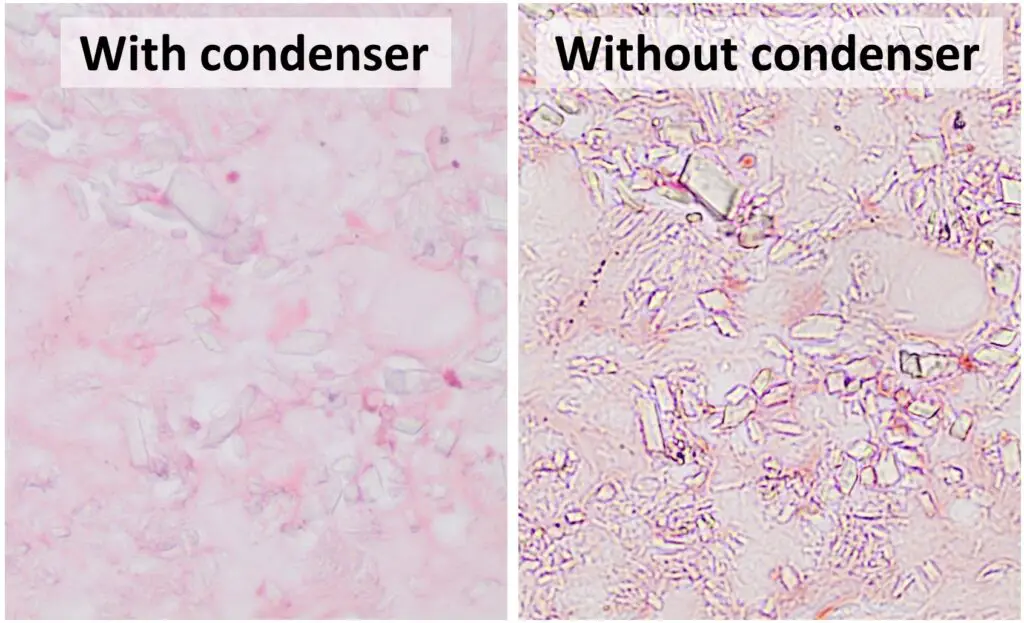
- Enhancing Image Resolution and Clarity: By concentrating light directly onto the specimen, condensers improve the resolution of the image. A higher resolution means finer details of the specimen can be observed more clearly.
- Controlling the Illumination Intensity and Angle: Condensers come with adjustable diaphragms (like the iris diaphragm) that allow users to control the intensity and angle of the light beam. This adjustability is crucial for various microscopy techniques and for observing specimens with different thicknesses or opacities.
- Improving Contrast: By adjusting the condenser, especially the diaphragm, users can enhance the contrast in the microscopic image. Contrast is important for distinguishing different structures or components within the specimen.
- Correcting Optical Aberrations: Advanced condensers, like aplanatic and achromatic condensers, are designed to correct optical aberrations such as spherical and chromatic aberrations. This correction leads to sharper and more color-accurate images.
- Matching the Objective Lens: The condenser is adjusted to match the numerical aperture of the objective lens in use. This matching is essential to ensure that the light is optimally utilized for the magnification and resolution capabilities of the objective lens.
- Facilitating Specialized Microscopy Techniques: Specialized condensers like dark field, phase contrast, or those used in fluorescence microscopy, enable specific imaging techniques. These condensers modify the light path or employ additional elements to produce images with enhanced characteristics, such as improved contrast or specific illumination styles.
FAQ
What is the condenser of a microscope?
The condenser is an optical component in a microscope that gathers and focuses light onto the specimen, improving illumination and image quality.
What is the primary function of the condenser?
The condenser’s main function is to provide even and controlled illumination of the specimen, enhancing image clarity and contrast.
How does the condenser distribute light evenly?
The condenser achieves even light distribution by converging divergent light rays from the light source into a parallel or convergent beam before it reaches the specimen.
What is aberration correction by a condenser?
Aberration correction refers to the condenser’s ability to minimize optical distortions, such as chromatic aberration (color fringing) and spherical aberration (blurry edges), leading to sharper and more accurate images.
Can the condenser be adjusted?
Yes, the condenser’s position can be adjusted to control the angle and focus of the light on the specimen. This adjustment can impact image quality and illumination.
What is the relationship between numerical aperture and the condenser?
The numerical aperture (NA) of the condenser should match that of the objective lens for optimal imaging. Matching NA values ensure proper illumination and resolution.
What are specialized condensers used for?
Specialized condensers are designed for specific microscopy techniques, such as dark field, phase contrast, and fluorescence microscopy, which enhance contrast and visibility of certain specimens.
Why is the Abbe condenser important in microscopy?
The Abbe condenser, developed by Ernst Abbe, significantly improved illumination quality by eliminating imperfections in early microscope lighting, leading to clearer images.
How does oil immersion affect the condenser’s numerical aperture?
Oil immersion can enhance the condenser’s numerical aperture by minimizing light loss and improving light convergence, resulting in improved image resolution, especially at high magnifications.
Can the condenser be used with different objective lenses?
Yes, the condenser can be used with different objective lenses, but adjusting its settings, such as its position and aperture, may be necessary to match the specific numerical aperture requirements of each objective.
