
Table of Contents
What are Microscopes?
- Microscopes are essential scientific instruments designed for the observation of objects too small to be seen by the naked eye. These devices are fundamental in various scientific fields, including biology, microbiology, and materials science, due to their ability to magnify tiny specimens such as cells, microorganisms, and even atomic structures.
- At the heart of a microscope’s functionality are its lenses. These lenses are crafted with specific magnification abilities, allowing them to enlarge the image of the specimen under study. The magnification power varies depending on the lens type and its focal properties. This magnification is crucial for detailed observation and study of the microscopic world.
- The construction of microscopes involves both structural and optical components. The structural parts include the frame and mechanisms for holding and adjusting the position of the specimen and lenses. Meanwhile, the optical components are primarily responsible for magnification and image clarity. These components work together to produce a clear, enlarged image of the specimen.
- Microscopes have evolved over time, and now there is a variety of types available, each suited to different applications. For instance, light microscopes use visible light to illuminate specimens, while electron microscopes employ a beam of electrons for much higher magnification, allowing for the visualization of structures at a molecular level. Other types include dark-field microscopes, which are excellent for visualizing specimens that are invisible under standard light microscopy, and fluorescent microscopes, which use fluorescence to observe specific features of a specimen.
- Furthermore, modern microscopes often incorporate advanced electronics and display technologies, enhancing their capabilities and ease of use. These innovations enable researchers to capture, analyze, and share images more efficiently, making microscopes more versatile and valuable tools in scientific research.
- In summary, microscopes are vital instruments in the scientific community, enabling the detailed study of microscopic entities. Their design, incorporating various lenses and structural components, allows them to provide high levels of magnification, essential for the observation and analysis of tiny specimens across multiple scientific disciplines.


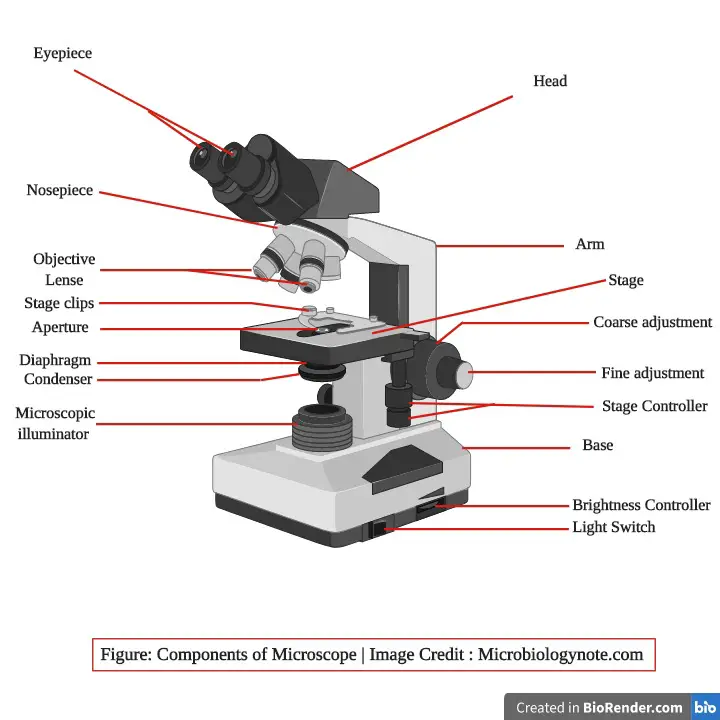
Parts of a Microscope
The microscope parts are divided into two main categories, such as;
- Structural parts of microscope
- Optical parts of microscope

Structural parts of a microscope and their functions
- Head (Body Tube)
- Location: The head, often referred to as the body tube, is situated at the microscope’s apex.
- Function: Serving as a pivotal connector, the head links the eyepiece to the objective lenses, ensuring a seamless optical pathway for the visualization of specimens.
- Arm
- Location: The arm, a robust segment typically crafted from metal or plastic, extends laterally from the microscope, bridging the gap between the eyepiece tube and the base.
- Function: Beyond its role as a structural support, the arm is instrumental in upholding the weight of the microscope, especially the eyepiece tube, objective lens, and stage. Some advanced microscopes feature an articulated arm, equipped with multiple joints, which grants enhanced mobility to the microscope’s head, optimizing the viewing experience.
- Base
- Location: As the foundational segment, the base is positioned at the microscope’s lowermost part, offering a sturdy platform for the entire apparatus.
- Function: The base’s primary role is to impart stability to the microscope, ensuring it remains anchored during use. It is typically weighted and robust, designed to counterbalance the microscope’s weight and any external forces applied during operation. Additionally, the base houses adjustment mechanisms, such as the coarse and fine focus knobs, facilitating precise image focusing. It also accommodates the stage, a designated platform for specimen placement, and a light source to illuminate the specimen for optimal viewing.
| Structural parts of a microscope | Location | Function |
|---|---|---|
| Head (Body Tube) | Situated at the microscope’s apex. | Serves as a pivotal connector, linking the eyepiece to the objective lenses, ensuring a seamless optical pathway for specimen visualization. |
| Arm | Extends laterally from the microscope, connecting the eyepiece tube to the base. | Provides structural support, upholding the weight of the microscope, especially the eyepiece tube, objective lens, and stage. Some advanced models feature an articulated arm for enhanced mobility. |
| Base | Positioned at the microscope’s lowermost part. | Imparts stability, ensuring the microscope remains anchored during use. Houses adjustment mechanisms, the stage, and a light source for optimal specimen viewing. |

Optical parts of a microscope and their functions
- Eyepiece (Ocular Lens)
- Description: Positioned at the microscope’s top, the eyepiece is the lens through which a viewer observes the specimen. It magnifies the image generated by the objective lens. The eyepiece comprises two lenses: the ocular (closer to the eye) and the eyepiece lens (farther from the eye).
- Function: The eyepiece enhances the magnification of the specimen image. It also corrects any aberrations from the objective lens. The total magnification is calculated by multiplying the eyepiece’s magnification with that of the objective lens.
- Eyepiece Tube
- Description: This component holds the eyepiece and connects it to the objective lenses.
- Function: It serves as a conduit for the magnified image from the objective lens to the eyepiece.
- Nosepiece (Revolving Turret)
- Description: Situated above the stage, the nosepiece is a rotating mechanism that houses the objective lenses.
- Function: It facilitates the switching between different objective lenses, allowing for varying magnification levels.
- Objective Lenses
- Description: These lenses, located beneath the nosepiece, are responsible for the initial magnification of the specimen. They come in varying magnifications, commonly 4X, 10X, 40X, and 100X.
- Function: Objective lenses gather and focus light from the specimen to create a real image, which the eyepiece then magnifies.
- Adjustment Knobs
- Description: These knobs, typically present as coarse and fine focus knobs, enable the user to adjust the focus of the specimen.
- Function: They facilitate the precise positioning of the specimen for optimal clarity.
- Stage
- Description: The stage is a flat platform where the specimen, typically mounted on a slide, is placed for observation.
- Function: It supports and holds the specimen in the correct position for viewing.
- Stage Clips
- Description: These are small clamps on the stage used to secure the specimen slide in place.
- Function: They ensure the specimen remains stationary during observation, enabling a clear, focused view.
- Aperture
- Description: Located beneath the objective lens, the aperture is an opening that regulates the amount of light reaching the specimen from the illuminator.
- Function: It controls light intensity, enhancing image contrast and resolution.
- Microscopic Illuminator (Built-In Light Source)
- Description: This is the microscope’s light source, illuminating the specimen for observation. It can be halogen, LED, or fluorescent-based.
- Function: It provides consistent and adequate illumination, ensuring the specimen is visible and details are discernible.
| Optical parts of a microscope | Description | Function |
|---|---|---|
| Eyepiece | – Located at the top of the microscope. – Contains two lenses: ocular (near the eye) and eyepiece (away from the eye). – Magnifying power varies from 5x to 30x, commonly 10X or 15X. – Known as ocular. | – Magnifies the image produced by the objective lens. – Corrects defects of the objective. |
| Eyepiece Tube | – Holds the eyepieces. – Equipped with one or two eyepieces. | – Connects the eyepiece and ocular lens to the objective lenses. |
| Nosepiece | – Rotating turret that holds the objective lenses. – Known as a revolving turret. | – Holds 2-3 objective lenses. – Allows switching between different objective lenses. |
| Objective Lenses | – Located below the Nosepiece. – Types: Achromatic, Fluorite, Apochromatic. – Magnification power: 4X, 10X, 40X, 100X. | – Increases magnification levels of specimen image. – Unites light rays from the object point to the image point. |
| Adjustment Knobs | – Includes coarse focus knob and fine focus knob. | – Coarse focus knob makes large adjustments. – Fine focus knob makes precise adjustments. |
| Stage | – Platform where the specimen is placed.<br>- Often equipped with stage clips and a stage aperture. | – Holds and positions the specimen for viewing. |
| Stage Clips | – Types: Spring-loaded, Thumbscrew, Lever-controlled, Magnetic. | – Securely holds the specimen in place on the stage. |
| Aperture | – Adjustable opening controlling light passage. – Located below the stage. | – Controls the amount of light illuminating the specimen. |
| Microscopic Illuminator | – Types: Halogen lamps, LED lamps, Fluorescent lamps. – Varieties: Transmitted light, Reflected light, Epi-lit. | – Provides illumination for the microscope. – Captures light from an external source. |
1. Eyepiece
In the realm of microscopy, the eyepiece, also known as the ocular, plays a pivotal role in visualizing minute specimens with clarity and precision. Positioned at the apex of the microscope, the eyepiece is a sophisticated lens system designed to augment the image generated by the objective lens.
Composition and Functionality
- The eyepiece is fundamentally composed of two distinct lenses: the ocular lens, which is proximal to the viewer’s eye, and the eyepiece lens, situated distally. This dual-lens system is meticulously designed to offer a clear and magnified view of the specimen. The ocular lens, in particular, can vary in its magnifying power, typically ranging from 5x to 30x. However, in standard microscopy settings, ocular lenses with magnifications of 10X or 15X are predominantly utilized.
- To ascertain the overall magnification provided by a microscope, one must multiply the magnification of the eyepiece with that of the objective lens. For instance, employing a 10X eyepiece in conjunction with a 40X objective lens yields a total magnification of 400X.
Types of Eyepieces
Microscopes are equipped with a variety of eyepieces, each tailored for specific applications:
- Huygenian Eyepiece: Characterized by two plano-convex lenses, with their convex facets oriented downwards. Termed as a negative eyepiece, it is a rudimentary design.
- Hyperplane Eyepiece: These are advanced eyepieces, known by various names such as Planoscopic and Periplane. They are compatible with high-power objectives, including achromatic, fluorite, and apochromatic, ensuring minimal chromatic aberrations.
- Compensating Eyepiece: This eyepiece is a triad of achromatic lenses, offering superior correction compared to the Huygenian and Hyperplane variants.
Integral Functions of the Eyepiece
The eyepiece is not merely a magnifying tool; it serves multiple critical functions:
- Magnification: The primary role of the eyepiece is to magnify the specimen’s image, enabling detailed observation.
- Image Correction: The eyepiece rectifies any aberrations or imperfections introduced by the objective lens, ensuring a crisp and accurate representation of the specimen.

2. Eyepiece tube
In the intricate architecture of a microscope, the eyepiece tube stands as a pivotal component, serving as the conduit between the observer and the microscopic realm. Positioned superiorly to the stage, this tube plays a cardinal role in image magnification and clarity.
Structure and Composition
- The eyepiece tube is a cylindrical structure, typically crafted from robust materials such as metal or high-grade plastic, ensuring durability and stability. Its primary function is to house the eyepieces, which are the lenses responsible for further magnifying the image initially formed by the objective lens.
- Within the eyepiece tube, one can typically find one or two adjustable eyepieces. These eyepieces not only magnify the image but also come equipped with mechanisms that allow users to refine the image’s focus. Furthermore, they possess diopter adjustments, facilitating users to calibrate the eyepiece in accordance with their visual acuity.
Functional Significance
The eyepiece tube is not merely a structural element; it embodies several crucial functions:
- Image Magnification: By housing the eyepieces, the tube plays an instrumental role in magnifying the image rendered by the objective lens, thereby enabling detailed observation.
- Connection: The tube serves as the connecting bridge between the ocular lens (or eyepiece) and the objective lenses. This connection is vital for the seamless integration of magnified images from both lens systems.
- Stability: Given its robust construction, the eyepiece tube ensures that the eyepieces remain securely anchored, minimizing any potential disruptions during microscopic observations.
In essence, the eyepiece tube is not just a passive conduit but an active participant in the microscopy process. Its design and functionalities underscore its indispensable role in ensuring that microscopic observations are clear, magnified, and precise.
3. Nosepiece

In the realm of microscopy, the nosepiece emerges as a fundamental component, ensuring versatility and precision in observations. Often referred to as the “revolving turret,” this part is strategically positioned above the stage, acting as the mediator between the specimen and the observer.
Structural Details
- The nosepiece is a rotatable turret, meticulously designed to accommodate multiple objective lenses. These lenses, each with distinct magnification capabilities, are securely held in the turret. The construction, predominantly of metal or high-grade plastic, ensures durability and facilitates smooth rotation.
Operational Mechanism
- The primary function of the nosepiece is to provide users with the flexibility to choose the appropriate objective lens for their observations. By simply rotating the turret, users can align the desired objective lens with the eyepiece, thereby adjusting the magnification level. This mechanism allows for swift transitions between different magnifications, enhancing the efficiency of microscopic examinations.
Significance in Microscopy
The nosepiece’s pivotal role can be summarized as follows:
- Versatility: With the ability to house multiple objective lenses, typically ranging from 2 to 3, the nosepiece offers a spectrum of magnification options to the user.
- Precision: By enabling users to swiftly switch between lenses, the nosepiece ensures that the most suitable magnification is employed for each observation, guaranteeing clarity and detail.
- Stability: The robust construction of the nosepiece ensures that the objective lenses are firmly anchored, minimizing potential disruptions during rotations and ensuring alignment accuracy.
4. Microscope Objective lenses
In the intricate design of a microscope, objective lenses play a pivotal role in determining the clarity and magnification of the specimen being observed. Positioned strategically beneath the nosepiece, these lenses are the primary agents of magnification in microscopy.
Structural and Functional Dynamics
- Typically, a standard microscope is equipped with 3 to 4 objective lenses, each offering different magnification capabilities. These lenses range from 4X (scanning objective) to 100X (oil immersion objective lens). When combined with a common 10X eyepiece, the total magnification achieved can range from 40X to a staggering 1000X. For instance, a 40X objective lens paired with a 10X eyepiece yields a total magnification of 400X.
Types of Objective Lenses:
- Achromatic: These are basic lenses that are relatively affordable. As the magnification power increases, controlling aberrations with achromatic lenses becomes more challenging.
- Fluorite (Semi-Apochromatic): These lenses, often termed as semi-apochromatic, have a superior ability to control aberrations, thanks to the use of fluorite in their construction.
- Apochromatic: Representing the pinnacle of objective lens design, apochromatic lenses are the most expensive. They are meticulously crafted to correct aberrations to a high degree of perfection.
Operational Precautions:
When storing the microscope post-usage, it’s imperative to ensure the 4X scanning objective is securely positioned in the rotating nosepiece. Additionally, the stage should be centrally aligned, with the objectives elevated away from it to prevent potential damage.
Key Functions of Objective Lenses:
- Magnification: Objective lenses are primarily responsible for magnifying the specimen’s image, enabling detailed observations.
- Light Convergence: These lenses gather light rays emanating from the specimen and focus them to form a clear image.
- Image Formation: By uniting light rays at specific points, objective lenses ensure the formation of a sharp and distinct image.
5. The Adjustment knobs

In the realm of microscopy, ensuring a clear and precise view of the specimen is paramount. This clarity is achieved through the meticulous use of adjustment knobs, which are integral components of a microscope designed to refine the focus of the image.
Structural Overview:
Microscopes are typically equipped with two primary adjustment knobs: the coarse focus knob and the fine focus knob. Each serves a distinct purpose in the process of image optimization.
- Coarse Focus Knob: Positioned on the side of the microscope, this knob facilitates broad adjustments to the image’s focus. Its primary function is to maneuver the objective lens vertically, either moving it closer to or farther from the specimen. This knob is especially useful for initially bringing the specimen into the field of view.
- Fine Focus Knob: Located atop the microscope, this knob is designed for precision. It complements the coarse focus knob by enabling minute adjustments to the image’s clarity. When the specimen is roughly in focus using the coarse knob, the fine focus knob refines the image, ensuring sharpness and detail.
Operational Dynamics:
- The process of focusing typically begins with the coarse focus knob, which quickly brings the specimen into a general focus. Once this preliminary focus is achieved, the fine focus knob is employed to sharpen the image, especially when utilizing high-power lenses. For low-power lenses, the fine focus knob ensures the specimen’s sharp and detailed appearance.
Functions of Adjustment Knobs:
- Initial Focusing: The coarse focus knob is the primary tool for initially positioning the specimen within the microscope’s field of view.
- Refinement: The fine focus knob is essential for refining the image, ensuring that every detail of the specimen is crisply and clearly visible.
6. Stage
In the intricate world of microscopy, the stage serves as a foundational component, providing a stable platform for specimens during the observation process. Its strategic placement and design ensure that specimens are optimally positioned for detailed examination under the objective lens.
Structural and Functional Attributes:
- Position and Design: Situated directly beneath the objective lens, the stage is a flat platform designed to support and stabilize the specimen. Its location is crucial for aligning the specimen with the focal plane of the objective lens, ensuring clear and detailed visualization.
- Material and Surface: Typically constructed from durable materials like metal or glass, the stage is designed to withstand the weight of various specimens. Its surface is often treated with a non-reflective coating, minimizing glare and enhancing the image contrast.
- Adjustability: Modern microscopes often feature adjustable stages, granting users the flexibility to maneuver specimens both horizontally and vertically. This adjustability ensures precise alignment with the objective lens, optimizing the viewing experience.
- Stage Clips and Aperture: To secure specimens in place, the stage is equipped with clips. Additionally, the stage aperture, an adjustable opening, plays a pivotal role in regulating the light intensity passing through the specimen, further refining the image quality.
- Mechanical Stage: Many advanced microscopes incorporate a mechanical stage, characterized by two control knobs. While one knob facilitates lateral movement (left and right), the other governs the anterior-posterior positioning (forward and backward) of the specimen.
Core Functions of the Stage:
- Specimen Support: The primary role of the stage is to provide a stable platform for specimens, ensuring they remain stationary during microscopic examination.
- Alignment and Positioning: With its adjustable features, the stage allows for precise positioning of the specimen in relation to the objective lens, ensuring optimal focus and clarity.
- Light Regulation: Through the stage aperture, the stage controls the amount of light illuminating the specimen, which is vital for achieving the desired image contrast.

7. Stage clips
In the realm of microscopy, stage clips play a pivotal role in ensuring the stability and precision of specimen observation. These small yet crucial components are designed to firmly secure the specimen on the microscope’s stage, ensuring that it remains stationary during the examination process.
Structural and Functional Insights:
- Location and Design: Stage clips are strategically positioned on the stage, typically at its sides or corners. Their primary function is to clamp the specimen, preventing any movement that could disrupt the viewing process.
- Material Composition: Crafted from durable materials such as metal or plastic, stage clips are designed to withstand regular usage. Their adjustability ensures they can accommodate specimens of diverse sizes and configurations.
- Variety of Stage Clips: The world of microscopy boasts a range of stage clips, each tailored for specific applications. Some of the prominent types include:
- Spring-loaded Clips: Utilizing a spring mechanism, these clips offer ease of use and versatility in holding various specimen sizes.
- Thumbscrew Clips: With a focus on providing a firm grip, these clips are manipulated using a thumbscrew. They are particularly beneficial for securing larger or weightier specimens.
- Lever-controlled Clips: Operated via a lever, these clips are adept at holding smaller or fragile specimens without causing damage.
- Magnetic Clips: Employing magnetic forces, these clips are ideal for thin or translucent specimens, ensuring minimal damage.
- Significance in Microscopy: Stage clips are indispensable in microscopy. Their primary role is to ensure that the specimen remains undisturbed, facilitating a clear, sharp, and focused observation. The choice of clip often depends on the specimen’s nature and the specific requirements of the microscopic examination.
Core Functions of Stage Clips:
- Specimen Stability: The foremost function of stage clips is to anchor the specimen slide, ensuring it remains immobile during the observation process.
- Versatility: With their adjustable design, stage clips can accommodate a wide range of specimen sizes and shapes, offering flexibility in microscopic examinations.
- Protection: Especially in the case of delicate specimens, stage clips ensure that the specimen is held securely without causing any damage.
8. Aperture
In the intricate world of microscopy, the aperture holds a position of paramount importance, playing a pivotal role in the illumination and visualization of specimens.
Structural and Functional Insights:
- Position and Design: The aperture is strategically situated beneath the stage, specifically below the objective lens. It serves as an adjustable opening, meticulously designed to regulate the quantum of light that illuminates the specimen.
- Composition: Typically, the aperture is crafted from overlapping blades, which could be of metal or glass. These blades are adjustable, allowing for the modulation of light intensity passing through.
- Operational Mechanism: The aperture’s functionality can be manipulated using a lever or a knob present on the microscope. This adjustability is crucial for controlling the image’s brightness and contrast, ensuring optimal visualization.
- Collaboration with the Diaphragm: Often working in tandem with the diaphragm (or iris), the aperture plays a crucial role in specimen illumination. While the diaphragm determines the light’s diameter, the aperture controls its intensity.
- Focusing Capabilities: Beyond its primary role in illumination, the aperture also aids in focusing light on the specimen. This becomes particularly beneficial for specimens that exhibit thinness or transparency, enhancing the image’s contrast and resolution.
Core Functions of the Aperture:
- Light Regulation: The aperture’s primary function is to control the amount of transmitted light that reaches the stage, ensuring the specimen is illuminated appropriately.
- Image Enhancement: By adjusting the aperture, one can significantly improve the contrast and resolution of the image, especially for specimens that might be challenging to view under standard conditions.
- Optimal Visualization: The aperture, in conjunction with other microscope components, ensures that the specimen is viewed under optimal lighting conditions, paving the way for detailed and accurate observations.
9. Microscopic illuminator or Built-In Light Source

In the realm of microscopy, the microscopic illuminator, often referred to as the built-in light source, stands as a cornerstone, ensuring that specimens are adequately illuminated for precise observation and analysis.
Anatomy and Functionality of the Microscopic Illuminator:
- Position and Role: Typically situated beneath the microscope’s stage, the illuminator’s primary function is to cast light onto the specimen. This light, after traversing the specimen, is captured by the objective lens, which subsequently magnifies the image, projecting it either onto the eyepieces or an associated camera.
- Varieties of Illuminators: The world of microscopy boasts a diverse array of illuminators, each tailored for specific applications. The primary types include:
- Halogen Lamps: These are conventional illuminators known for their bright, white luminescence. While cost-effective and long-lasting, they tend to produce considerable heat.
- LED Lamps: Emerging as a modern alternative, LED lamps are celebrated for their energy efficiency and reduced heat output. However, their luminosity might be slightly subdued compared to halogens.
- Fluorescent Lamps: Ideal for viewing thin specimens or those labeled with fluorescent markers, these lamps emit a uniform, diffused light.
- Optical Microscopes and Their Illumination Techniques: Optical microscopes, equipped with an intrinsic illuminator, employ various illumination methodologies:
- Transmitted Light Microscopy: Here, the specimen is illuminated using transmitted light, which, after passing through the specimen, is collected by the objective lens.
- Reflected Light Microscopy: In this approach, light reflects off the specimen’s surface and is then focused by the objective lens.
- Epi-lit Microscopy: Employing epi-illumination, this technique illuminates the specimen perpendicularly from above. When an external light source is harnessed for this purpose, it’s termed epi-illumination.
Core Functions of the Microscopic Illuminator:
- Primary Light Source: The microscopic illuminator serves as the central light source for the microscope, ensuring specimens are well-lit for observation.
- Light Capture: Harnessing light from an external source, typically of a low voltage around 100v, the illuminator ensures consistent and optimal illumination.
10. Condenser

In the intricate world of microscopy, the condenser stands as a pivotal component, playing a crucial role in the illumination of specimens. Defined scientifically, a condenser comprises a series of lenses designed specifically to focus transmitted light onto the object positioned on the microscope’s stage.
Position and Role: The condenser is strategically located beneath the microscope’s stage, adjacent to its diaphragm. Its primary function is to gather and concentrate light emanating from the illuminator, directing it onto the specimen. This focused illumination is particularly vital when working with high magnifications, such as 400X and above. For achieving a resolution of 1000x, a sophisticated microscope equipped with an Abbe condenser becomes indispensable.
Types of Condensers and Their Illumination Methods:
- Bright Field Illumination:
- Abbe Condenser: A basic form, the Abbe condenser employs just two lenses and lacks corrections for both spherical and chromatic aberrations.
- Achromatic Condenser: Specifically designed to rectify chromatic aberration, this type of condenser is ideal for general microscopy applications.
- Plan Achromatic Condensers: Offering an extended field of view, these are optimal for observing expansive or planar specimens.
- Variable Focus Condenser: Incorporating a dual-lens system, this condenser features a stationary upper lens and a focus-adjustable lower lens.
- Plan Fluorite Condensers: Crafted from fluorite glass, these condensers minimize chromatic aberration, making them apt for observing thin or translucent specimens.
- Phase Contrast Condensers: Tailored for phase contrast microscopy, these condensers enhance image contrast, facilitating the study of unstained or transparent samples.
- Dark Field Illumination:
- Abbe Condenser: Adaptable for dark field illumination, this condenser can be modified either by introducing a dark field stop or by detaching its upper segment.
- Paraboloid Condenser: Paired with high-power oil immersion objectives, this condenser necessitates an intense light source.
- Cardioid Condenser: Exclusively crafted for examining colloidal solutions or suspensions, the cardioid condenser offers specialized illumination.
Functional Significance of the Condenser:
At its core, the condenser’s role is to amass and channel light from the illuminator, ensuring it is precisely focused on the specimen. This function is paramount for generating high-quality, clear images, especially at elevated magnifications.
11. Diaphragm

In the realm of microscopy, the diaphragm, often referred to as the iris, stands as a pivotal component, instrumental in modulating the light directed towards the specimen. This intricate mechanism is integral to achieving optimal illumination, ensuring clarity and precision in microscopic observations.
Position and Structure: Situated beneath the microscope’s stage, the diaphragm is strategically positioned between the light source and the objective lens. It is comprised of a series of overlapping blades, either metallic or glass, which can be meticulously adjusted to regulate the amount of light traversing through them. The manipulation of these blades is facilitated by a dedicated lever or knob on the microscope.
Functionality and Significance: The primary role of the diaphragm is to control the quantity of light that penetrates the objective lens, subsequently illuminating the specimen under observation. By adjusting the diaphragm, one can fine-tune the brightness and contrast of the resultant image, ensuring optimal visualization.
Furthermore, the diaphragm serves a dual purpose by aiding in focusing the light onto the specimen. This capability is particularly beneficial when examining specimens that are either thin or possess a degree of transparency. By concentrating the light, the diaphragm enhances both the contrast and resolution of the image, revealing intricate details that might otherwise remain obscured.
High-end microscopes often incorporate an Abbe condenser equipped with an iris diaphragm. This combination is pivotal in concurrently adjusting the focus and light intensity directed at the specimen. The iris, in particular, plays a crucial role in adjusting the aperture of the condenser. For instance, with a 10X objective, the iris is typically two-thirds closed, slightly open for a 40X objective, and fully open for a 100X objective. It’s imperative to note that to diminish light intensity, one should utilize the lamp’s brightness control rather than the iris, as over-narrowing the condenser aperture can compromise image resolution.

12. Condenser focus knob
Within the intricate architecture of a microscope, the condenser focus knob emerges as a pivotal component, dedicated to refining the illumination focus on the specimen. This mechanism, while seemingly simple, plays a crucial role in ensuring the clarity and precision of microscopic observations.
Location and Design: Positioned typically on the microscope’s side, near its base, the condenser focus knob is easily accessible to the user. Its primary function is to adjust the condenser’s position, a lens system strategically located beneath the stage. By manipulating the condenser’s position, the focus of the light emanating from the illuminator onto the specimen is fine-tuned.
Operational Significance: The condenser’s primary role is to concentrate the light onto the specimen. The condenser focus knob, by adjusting the condenser lens’s position, modulates this light focus, ensuring that the specimen is illuminated optimally. This adjustment is particularly vital when examining specimens that are thin or possess transparency. Proper utilization of the condenser focus knob can significantly enhance the image’s contrast and resolution.
While the condenser focus knob adjusts the light’s focus, it works in tandem with the fine focus knob. The latter is responsible for adjusting the objective lens’s focus. The synchronized operation of these two knobs ensures that the specimen is viewed with utmost clarity and sharpness.
Functional Overview: The primary function of the condenser focus knob is to maneuver the condenser vertically, either moving it upwards or downwards. This movement directly influences the light’s focus on the specimen. By adjusting the condenser’s position, the user can achieve the desired level of clarity and detail in the image.
In the realm of microscopy, where precision is paramount, the condenser focus knob stands as an indispensable tool. It offers the user the ability to fine-tune the illumination focus, ensuring that each observation is clear, detailed, and of the highest quality. Its role, though subtle, underscores the importance of meticulous adjustments in achieving optimal microscopic results.
13. The rack stop
In the intricate world of microscopy, the rack stop emerges as a safeguard, ensuring the protection of both the specimen and the objective lens. This mechanism, while often overlooked, plays a pivotal role in maintaining the integrity of microscopic observations.
Position and Structure: Situated above the stage, the rack stop is a strategically placed component on the microscope’s base. It is typically manifested as a small metal pin or stop, positioned proximate to the focus knob.
Operational Role: The primary function of the rack stop is to restrict the motion range of the focus knob. This limitation is crucial to prevent the objective lens from descending excessively and inadvertently making contact with the specimen. Such unintended contact poses a risk of damaging the specimen or even the objective lens. By confining the focus knob’s movement, the rack stop acts as a protective barrier, ensuring that the objective lens maintains a safe distance from the specimen.
Usage and Mechanism: To employ the rack stop, users adjust the focus knob to the desired focal point. Subsequently, the rack stop is engaged, effectively locking the focus knob’s position. This locked position ensures that the focus knob does not inadvertently descend too far. Releasing the rack stop is straightforward, typically involving the activation of a button or lever, which then permits further adjustments to the focus knob.
Functional Overview: The rack stop serves multiple purposes:
- Distance Regulation: It meticulously controls the gap between the stage and the objective lens, ensuring that they never come too close.
- Protection: By preventing the objective lens from nearing the specimen slide excessively, the rack stop acts as a protective shield against potential damage.
- Fine Focus Adjustments: Especially when dealing with fragile specimens, the rack stop aids in making precise focus adjustments without the risk of contact.
The rack stop, though a subtle component in the microscope’s architecture, holds paramount importance. It acts as a sentinel, ensuring that the delicate dance between the specimen and the objective lens remains harmonious, preventing any inadvertent damage. Its presence underscores the meticulous design considerations in microscopy, where every detail is crafted to enhance precision while ensuring safety.
The parts of the microscope and their roles are summarised in the table below.
What are the parts of a microscope?
| Microscope Part | Role/Function |
|---|---|
| Eyepiece (Ocular lens) | Magnifies the image produced by the objective lens. Provides the final magnification before viewing. |
| Objective lens | Primary lenses that magnify the specimen. Different objectives offer varying magnifications (e.g., 10x, 40x, 100x). |
| Stage | Platform where the specimen slide is placed for observation. |
| Light source/Illuminator | Provides the necessary light to view the specimen. Can be LED, halogen, or other types of lights. |
| Diaphragm (Iris) | Controls the amount of light reaching the specimen. Adjusts contrast and resolution. |
| Condenser | Focuses light from the illuminator onto the specimen. Enhances clarity and resolution. |
| Condenser focus knob | Adjusts the focus of light from the illuminator onto the specimen by moving the condenser lens. |
| Microscopic illuminator | Provides light to the microscope, illuminating the specimen for observation. |
| Rack stop | Limits the range of motion of the focus knob to prevent the objective lens from touching the specimen. |
| Coarse focus knob | Makes large adjustments to the focus, primarily used to bring the specimen into general focus. |
| Fine focus knob | Makes fine adjustments to the focus, refining the clarity of the specimen after using the coarse focus. |
| Base | Supports the microscope and houses the light source. |
| Arm | Supports the tube and connects to the base. Used to carry the microscope. |
| Revolving nosepiece | Holds multiple objective lenses and allows the user to switch between them for different magnifications. |
| Slide clips | Holds the specimen slide in place on the stage. |
Which part of an optical microscope contains a magnifying lens?
In an optical microscope, the parts that contain magnifying lenses are the eyepiece (ocular lens) and the objective lenses. Both of these components play a crucial role in magnifying the specimen being observed:
- Objective lenses: These are the primary lenses that first magnify the specimen. They are located closest to the specimen and are mounted on the revolving nosepiece. Different objective lenses offer varying magnifications, such as 4x, 10x, 40x, and 100x.
- Eyepiece (Ocular lens): This is the lens through which the observer looks. It provides additional magnification to the image produced by the objective lens. Common eyepiece magnifications are 10x or 15x.
The total magnification achieved by an optical microscope is the product of the magnifications of the objective lens and the eyepiece. For example, using a 10x eyepiece with a 40x objective lens would result in a total magnification of 400x.
Parts of a Electron Microscope
An electron microscope is a type of microscope that uses a beam of electrons to produce high-resolution images of samples. Here are some of the main parts of an electron microscope:
- Electron gun: This is the source of the electron beam that is used to illuminate the specimen. It typically consists of a cathode, which emits electrons, and an anode, which accelerates the electrons to a high energy level.
- Objective lens: This lens system focuses the electron beam onto the specimen and magnifies the image. It is usually made of a series of electromagnetic lenses that are capable of focusing the electrons to a very small spot size.
- Specimen stage: This is the platform on which the specimen is placed for viewing. It is typically equipped with a range of mechanical and electrical controls that allow the specimen to be moved and positioned as needed.
- Condenser lenses: These lenses focus the electron beam onto the specimen and are used to control the size and intensity of the beam.
- Column: This is the main part of the electron microscope and houses the electron gun, objective lens, and other components. It is typically made of metal and is designed to be vacuum-sealed to prevent contamination of the sample.
- Detector: This device is used to detect the electrons that are scattered by the specimen and to produce an image of the sample. There are several different types of detectors that are used in electron microscopes, including scintillators, CCD cameras, and photomultiplier tubes.
Overall, these are some of the main parts of an electron microscope. Each of these components plays an important role in producing high-resolution images of the sample being studied.
Parts of a scanning Electron Microscope
A scanning electron microscope (SEM) is a type of electron microscope that produces high-resolution images of samples by scanning a beam of electrons across the surface of the specimen. Here are some of the main parts of a scanning electron microscope:
- Electron gun: This is the source of the electron beam that is used to illuminate the specimen. It typically consists of a cathode, which emits electrons, and an anode, which accelerates the electrons to a high energy level.
- Specimen stage: This is the platform on which the specimen is placed for viewing. It is typically equipped with a range of mechanical and electrical controls that allow the specimen to be moved and positioned as needed.
- Column: This is the main part of the electron microscope and houses the electron gun, objective lens, and other components. It is typically made of metal and is designed to be vacuum-sealed to prevent contamination of the sample.
- Scanning coils: These electromagnets are used to deflect the electron beam and scan it across the surface of the specimen.
- Detector: This device is used to detect the electrons that are scattered by the specimen and to produce an image of the sample. There are several different types of detectors that are used in electron microscopes, including scintillators, CCD cameras, and photomultiplier tubes.
- Image processing system: This is a computer system that is used to analyze the data collected by the detector and to produce a high-resolution image of the specimen.
Overall, these are some of the main parts of a scanning electron microscope. Each of these components plays an important role in producing high-resolution images of the sample being studied.
Microscope Terms
| Term | Description |
|---|---|
| Abbe Condenser | Lens under the stage, controls light beam size and center for higher magnifications. |
| Achromatic Lens | Corrects light dispersion in prisms and lenses, commonly used in microscopes. |
| Arm | Connects eyepiece tube to the base of the microscope. |
| Articulated Arm | Part of a boom microscope stand, allows flexible movement for viewing. |
| Base | Supports the microscope. |
| Binocular Microscope | Microscope with two eyepiece lenses for high-power or stereo viewing. |
| Body (Head) | Upper part of the microscope with eyepieces and objectives. |
| Boom Stand | Microscope base with an adjustable arm for versatile positioning. |
| Calibration | Math used to determine precise distances with a reticle. |
| Camera Adapter | Kit for attaching a camera to a microscope’s trinocular port. |
| Clamp Base | Replaces the traditional base on a boom microscope, clamps to a workbench. |
| C-Mount | Adapter for attaching a lens to a camera with standard thread. |
| Coarse Focus | Knob to raise and lower the objective lens for rough focusing. |
| Coaxial Focus | System where coarse and fine focus knobs are on the same axis. |
| Comparison Microscope | Allows viewing two different things simultaneously. |
| Compound Microscope | High-power microscope with multiple objective lenses. |
| Condenser | Lens that focuses light on a specimen for better resolution. |
| Contrast Plate | Found in stereo microscopes, black and white sides to adjust contrast. |
| Cover Slip | Thin glass or plastic piece placed over the specimen on a slide. |
| Darkfield Microscopy | Illumination technique to enhance unstained specimens. |
| Darkfield Plate | Circular iris above the light source in the base for lateral lighting. |
| Digital Microscope | Microscope with a built-in digital camera for image capture. |
| DIN | Standard for microscope objective lenses with a 20mm thread diameter. |
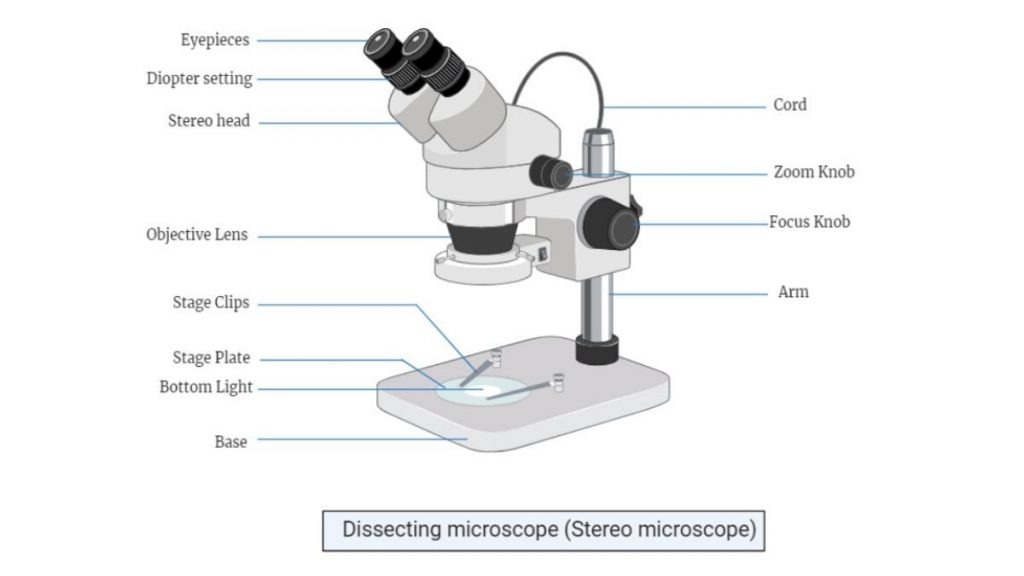
| Dissecting Microscope | Stereo microscope used for lab work. |
| Doublet Lens | Two lenses combined to improve color performance in eyepieces. |
| Dual-View | Monocular microscope with a second viewing port, often used in teaching. |
| Electron Microscope | Uses electrons instead of light for higher magnification and resolution. |
| Eyepiece | Lens closest to the eye, determines part of the total magnification. |
| Eyepiece Tube | Tube holding the eyepiece lens. |
| Fine Focus | Knob for fine-tuning the focus after coarse focusing. |
| Field of View | Size of the visible area through the microscope. |
| Focus | Adjusting the microscope to make the image clear. |
| Gem/Jeweler’s Microscope | Stereo microscope designed for viewing gems and jewelry. |
| Head | The upper part of the microscope housing eyepiece tubes and prisms. |
| Illumination System | Light source, often located under the stage. |
| Immersion Oil | Special oil used with the 100X objective for better focusing. |
| Interpupillary Distance | Space between eyepieces, adjustable for different users. |
| Inverted Microscope | Microscope with the light source above and lenses below the stage. |
| Iris Diaphragm | Controls light coming through the stage opening, improves contrast and resolution. |
| Jeweler’s Clip | Clip to hold precious stones and jewelry for easier viewing. |
| Koehler Illumination | Method for even lighting and reduced specimen heating. |
| Light Microscope | Any microscope using light for imaging. |
| Magnification | Enlargement of an object’s appearance through a microscope. |
| Mechanical Stage | Mechanism for moving a specimen on the stage, especially at higher magnifications. |
| Monocular Microscope | Compound microscope with a single eyepiece. |
| Nosepiece | Part holding the objective lenses, often rotatable. |
| Numerical Aperture | Measure of a lens’s ability to resolve details in relation to its focal length. |
| Objective Lens | Lens closest to the specimen that forms the image. |
| Oil Immersion Lens | Objective lens with 100X magnification, used with immersion oil. |
| Parcentered | Maintaining specimen’s center when changing objectives. |
| Parfocal | Keeping the specimen in focus when changing objectives. |
| Phase Contrast | Technique to improve contrast in transparent specimens. |
| Plan Lens | Objective lens that flattens the image for clarity. |
| Portable Microscope | Field microscope with rechargeable LED lighting. |
| Pointer | Wire in the eyepiece for pointing at specific specimen parts. |
| Pole Stand | Microscope stand with a single vertical pole for up and down movement. |
| Rack and Pinion Focusing Mechanism | Mechanism for precise focusing in better microscopes. |
| Rack Stop | Safety feature preventing the objective from hitting the stage. |
| Resolution | Lens’s ability to reveal small details in an object. |
| Reticle | Glass circle with measurements in the eyepiece for real measurements. |
| Revolving Nosepiece | Nosepiece with multiple objectives that can be rotated. |
| Ring Light | Additional light source for improved illumination, often on boom microscopes. |
| Semi-Plan Lens | Objective lens that improves image clarity by partially flattening the image. |
| Siedentopf Head | Head where eye distance adjusts by twisting eyepieces. |
| Slide | Flat glass or plastic piece for holding a specimen. |
| Slip Clutch | Mechanism allowing the focusing knob to slip when turned beyond its range. |
| Stage | Platform for holding slides and specimens. |
| Stage Clips | Clips on the stage to secure the slide in place. |
| Stand | Part connecting the body to the base in stereo or low-power microscopes. |
| Stereo Microscope | Low-power microscope with separate eyepiece and objective lenses for 3D viewing. |
| Sub-Stage | Components below the stage, such as the lighting system. |
| T-Mount | Adapter for attaching 35mm cameras to microscopes. |
| Tension Adjustment | Adjustment in the focusing mechanism for smooth operation. |
| Turret | Rotating mechanism for selecting various microscope parts. |
| Widefield Eyepiece | Improved eyepiece with a larger diameter for enhanced viewing. |
Applications of Microscopes
Microscopes are used in a wide range of scientific and medical fields, including biology, medicine, materials science, and nanotechnology. Here are a few examples of how microscopes are used in these fields:
- Biology: Microscopes are essential tools in biology and are used to study cells, tissues, and microorganisms. They are also used to study the internal structure of plants and animals, and to examine tissues and cells for signs of disease or damage.
- To study protein interaction or protein conformation.
- To Study the membrane dynamics.
- To study the concentration of calcium ion and pH changes.
- To Determine the shape of cells and intercellular structure.
- To determine the localization of specific proteins.
- To Study the Dynamics of protein.
- To study the iron concentration.
- Microscopes also used in forensic laboratories.
- Used in counting of blood cells.
- Medicine: Microscopes are used in medicine to examine tissues and cells for diagnostic purposes. They are also used in research to study the causes and effects of diseases, and to develop new treatments.
- Materials science: Microscopes are used in materials science to study the structure and properties of materials at the micro and nanoscale. This includes the study of metals, ceramics, polymers, and other materials.
- Nanotechnology: Microscopes are essential tools in the field of nanotechnology, which involves the study and manipulation of materials at the atomic and molecular level. Scanning probe microscopes and electron microscopes are commonly used to study the properties of nanomaterials.
Overall, microscopes play a vital role in many scientific and medical fields, allowing us to study and understand the world around us at a level of detail that would be otherwise impossible.
Parts of a Microscope and Their Functions ppt
Parts of a Microscope and Their Functions Video
Parts of a Microscope Worksheet
1. parts of a compound microscope Worksheet

Answer Sheet: https://microbiologynote.com/wp-content/uploads/2020/07/Parts-of-Microscpoe.jpeg
2. Dissecting microscope (Stereo microscope) Worksheet

Answer Sheet: https://microbiologynote.com/wp-content/uploads/2020/07/Untitled-design-1024×576.jpg
3. Inverted Microscope Worksheet

Answer Sheet: https://microbiologynote.com/wp-content/uploads/2020/07/Inverted-Microscope-1024×576.jpg
Quiz Practice
Which part of the microscope holds the objective lenses and allows them to be rotated to change magnification?
a) Stage
b) Eyepiece
c) Revolving nosepiece
d) Condenser
What is the primary function of the objective lens?
a) To provide a platform for the slide
b) To magnify the specimen
c) To adjust the amount of light
d) To focus light onto the specimen
Which part of the microscope is responsible for adjusting the amount of light that reaches the specimen?
a) Iris diaphragm
b) Objective lens
c) Eyepiece
d) Coarse focus knob
The __ focus knob is used for rapid and large adjustments in focus.
a) Fine
b) Coarse
c) Objective
d) Condenser
Which part of the microscope provides stability and ensures it remains upright?
a) Arm
b) Base
c) Stage
d) Revolving nosepiece
The _ is a lens system positioned below the stage that focuses light onto the specimen.
a) Eyepiece
b) Objective lens
c) Condenser
d) Iris diaphragm
Which microscope has two eyepieces for viewing?
a) Monocular microscope
b) Binocular microscope
c) Electron microscope
d) Digital microscope
What is the purpose of using immersion oil with certain objective lenses?
a) To clean the lens
b) To improve image clarity
c) To reduce magnification
d) To adjust the amount of light
Which part of the microscope is used to safely carry it?
a) Base
b) Stage
c) Arm
d) Revolving nosepiece
The total magnification of a microscope is calculated by multiplying the magnification of the _ and the objective lens.
a) Condenser
b) Iris diaphragm
c) Eyepiece
d) Stage
FAQ
Q. list the parts of a microscope and what they do. or parts of a microscope and what they do
There are several parts of a microscope, and each has a specific function:
- Base: The base is the lower part of the microscope that supports the rest of the instrument. It often has a built-in light source or a holder for a lamp.
- Stage: The stage is a platform that holds the sample being viewed. It is typically located just above the base and is adjustable so that the sample can be positioned in the field of view.
- Objective lenses: The objective lenses are located at the bottom of the microscope and are used to focus the image of the sample. There are typically several objective lenses of different magnifications available, and they can be rotated into place as needed.
- Revolving nosepiece: The revolving nosepiece is a turntable that holds the objective lenses and allows them to be rotated into position.
- Eyepiece: The eyepiece is the lens through which the user views the image of the sample. It is located at the top of the microscope and is often adjustable to accommodate users with different visual acuities.
- Arm: The arm is the long, horizontal part of the microscope that connects the base to the eyepiece.
- Fine focus knob: The fine focus knob is used to make small adjustments to the focus of the image. It is typically located near the eyepiece and is used in conjunction with the coarse focus knob.
- Coarse focus knob: The coarse focus knob is used to make larger adjustments to the focus of the image. It is typically located near the base of the microscope and is used in conjunction with the fine focus knob.
- Illumination system: The illumination system is the source of light that is used to illuminate the sample being viewed. It may be a lamp, LED, or other type of light source.
- Condenser: The condenser is a lens or system of lenses that is used to focus the light from the illumination system onto the sample. It is typically located below the stage and is adjustable to vary the intensity of the light.
- Diaphragm: The diaphragm is an adjustable opening that controls the amount of light that is allowed to pass through the condenser and onto the sample. It is used to fine-tune the illumination of the sample.
- Iris diaphragm: The iris diaphragm is a circular opening that is used to control the amount of light that is allowed to pass through the condenser. It is similar to the diaphragm but is typically used on more advanced microscopes.
What are parts of a microscope?
Ocular Lens (Eye Piece)
Diopter Adjustment
Nose Piece
Objective Lens
Arm (Carrying Handle)
Mechanical Stage
Stage Clip
Aperture
Diaphragm
Condenser
Coarse Adjustment
Fine Adjustment
Illuminator (Light Source)
Stage Controls
Base
Brightness Adjustment
Light Switch
Head
What is the best microscope to get a detailed view of the parts inside of a preserved plant cell?
Dissecting microscope is the best microscope to get a detailed view of the parts inside of a preserved plant cell
list the parts of a microscope and what they do?
Ocular Lens (Eye Piece): Help the viewer to see the magnified specimen.
Diopter Adjustment: Each microscope eyepiece has a diopter adjustment to allow you to make minor corrections to the image, compensating for the difference in vision between the two eyes.
Head: The head portion or body tube of microscope connects the eyepiece to the objective lenses.
Nose Piece: It holds 2 -3 objective lense.
Objective Lens: Helps to increase the magnification levels of specimen image.
Arm (Carrying Handle): The arm Supports the head or body tube and connects it to the base of the microscopes.
Mechanical Stage: The test specimen is placed over it for viewing.
Stage Clip: It holds the specimen slides in place.
Aperture: Through Aperture the base (transmitted) light reaches the stage.
Diaphragm: Diaphragm is used to vary the intensity and size of the cone of light that is projected upward into the slide.
Condenser: The condenser helps to collect and focus the light from the illuminator on to the specimen.
Coarse Adjustment: A coarse adjustment knob is used to focus the microscope. It is always used first, and it is used only with the low power objective.
Fine Adjustment: The fine adjustment knob is used to focus the microscope. It is used with the high power objective to bring the specimen into better focus
Illuminator (Light Source): light sources for Microscope.
Stage Controls: Used to move the stage.
Base: The bottom portion of Microscopes on which the arm portion is standing. It holds all the essential components.
Brightness Adjustment: Control the brightness of the Illuminator.
Light Switch: Used to turn on or turn off the light source of microscope.
Define a Microscope.
A microscope is a scientific instrument that is used to magnify small objects or organisms so that they can be observed more closely and in greater detail. It consists of an objective lens, which is the main lens that is used to focus the image, and an eyepiece, which is the lens that is used to view the image. The eyepiece is typically located at the top of the microscope, and the objective lens is located at the bottom, near the object or sample being viewed. The magnification of a microscope is determined by the ratio of the focal length of the objective lens to the focal length of the eyepiece. Some microscopes also have additional lenses or mirrors to further enhance the image and provide a clearer view. Microscopes are used in a variety of fields, including biology, medicine, and materials science, to study small structures and organisms that are not visible to the naked eye.
What is the best microscope to get a detailed view of the parts inside of a preserved plant cell?
To get a detailed view of the parts inside of a preserved plant cell, a high-power microscope with a high numerical aperture (NA) would be the best choice. The numerical aperture is a measure of the ability of a microscope to resolve fine details and is related to the size of the objective lens and the refractive index of the medium in which the sample is viewed. The higher the numerical aperture, the more light that can be collected by the objective lens and the more detailed the image will be.
One type of microscope that is particularly well-suited for viewing the internal structures of plant cells is the transmission electron microscope (TEM). TEMs use a beam of electrons rather than light to create an image, which allows them to achieve much higher magnifications and resolution than light microscopes. TEMs can magnify samples up to millions of times their actual size, making it possible to see very small structures, such as individual molecules, with great detail.
Another option for viewing plant cells in detail is a confocal laser scanning microscope (CLSM). CLSMs use lasers to scan a sample and create an image, and they can also achieve high magnifications and resolution. However, they are not as powerful as TEMs and are not able to resolve structures as small as those that can be seen with a TEM.
Overall, the best microscope for viewing the parts inside of a preserved plant cell will depend on the specific features you want to observe and the level of detail you require.
Which parts of a compound microscope magnify objects?
The objective lenses of a compound microscope are the main lenses that are used to magnify objects. These lenses are located at the bottom of the microscope, near the sample being viewed, and are used to focus the image of the sample onto the eyepiece. The eyepiece, which is located at the top of the microscope, is used to view the image and typically has a magnification of 10x or 15x. The total magnification of the microscope is the product of the magnification of the objective lens and the eyepiece. For example, if the microscope has a 10x eyepiece and a 100x objective lens, the total magnification would be 1000x. Some microscopes also have additional lenses or mirrors that can be used to further magnify the image or enhance the contrast.
What is the function of the objective lens in a microscope?
The objective lens is responsible for magnifying the specimen being observed. Different objective lenses offer varying levels of magnification, such as 4x, 10x, 40x, and 100x.
How does the eyepiece work in conjunction with the objective lens?
The eyepiece, also known as the ocular lens, further magnifies the image produced by the objective lens. The total magnification is calculated by multiplying the magnification of the eyepiece by that of the objective lens.
Why is the stage important in microscopy?
The stage provides a platform to place and secure the specimen slide. It often comes with clips to hold the slide in place and can be moved up and down to bring the specimen into focus.
What is the purpose of the condenser?
The condenser is a lens system positioned below the stage that focuses and directs light onto the specimen. It helps in enhancing the resolution and contrast of the specimen being viewed.
How do the coarse and fine focus knobs differ in function?
The coarse focus knob is used for rapid and large adjustments in focus, especially at lower magnifications. The fine focus knob allows for precise and minute adjustments, especially useful at higher magnifications.
What role does the iris diaphragm play in microscopy?
The iris diaphragm controls the amount of light reaching the specimen. By adjusting its size, users can change the contrast and resolution of the specimen’s image.
Why are there multiple objective lenses on a microscope’s revolving nosepiece?
The revolving nosepiece allows users to quickly switch between different levels of magnification by rotating to different objective lenses. This provides versatility in viewing specimens at varying scales.
How does a binocular microscope differ from a monocular one?
A binocular microscope has two eyepieces, allowing for stereo vision and a more three-dimensional view of the specimen. In contrast, a monocular microscope has only one eyepiece.
What is the function of the microscope’s base and arm?
The base provides stability to the microscope, ensuring it remains upright and steady during use. The arm connects the body of the microscope to the base and is used to safely carry the microscope.
Why is immersion oil used with certain objective lenses?
Immersion oil is used with high-power objectives, like the 100x lens, to improve image clarity. The oil reduces the scattering of light and increases the resolution by bridging the gap between the slide and the lens, ensuring that more light rays enter the objective lens.