Table of Contents
What are Diatoms?
- In the hidden depths of aquatic ecosystems, a remarkable group of organisms thrives, known as diatoms. These fascinating creatures are a type of photosynthetic algae, distinguished by their mesmerizing beauty and intricate glass-like structures. Diatoms come in various sizes, ranging from 2 to 500 microns in length or diameter, and they inhabit a wide array of aquatic environments, including freshwater, marine waters, and moist soils.
- At the heart of their uniqueness lies a transparent cell wall, scientifically termed a “frustule,” which is composed of hydrated silicon dioxide. This silica-based cell wall lends diatoms an enchanting appearance, resembling the shimmering elegance of opal. It acts as a protective glass house, shielding the delicate algae within while allowing them to interact with their environment. The incorporation of water molecules in the frustule further enhances their ethereal allure.
- The frustule of diatoms consists of two halves, also called “valves,” that fit together like a meticulously designed pill capsule. This intricate valve structure plays a pivotal role in their identification and classification. These valves enable diatoms to function as single cells, but they can also come together to form delicate filaments or simple colonies, enhancing their adaptability and ecological impact.
- An intriguing aspect of diatoms is their ability to conduct photosynthesis, harnessing the power of sunlight to produce energy for their growth and survival. In doing so, they serve as essential primary producers in aquatic ecosystems, contributing significantly to the food web. Moreover, their photosynthetic activities play a crucial role in the regulation of global carbon dioxide levels, making them invaluable players in the planet’s carbon cycle.
- Beyond their ecological importance, diatoms have captivated scientists, artists, and nature enthusiasts alike for centuries. Researchers use the intricate frustule patterns to identify and study different diatom species, unraveling the hidden diversity within these seemingly delicate organisms. Moreover, artists find inspiration in the breathtaking beauty of diatoms, capturing their intricate forms and patterns in various forms of creative expression.
- Despite their small size, diatoms wield immense power in shaping aquatic environments. By absorbing excess nutrients and releasing oxygen through photosynthesis, they help maintain water quality and support diverse aquatic life forms. As essential indicators of water health, diatoms serve as early warning systems for potential environmental disturbances, assisting in the preservation and conservation of fragile aquatic ecosystems.
- In conclusion, diatoms are awe-inspiring creatures that thrive as aquatic algae with breathtaking glass-like structures. Their transparent frustules, composed of hydrated silica, serve as both protective shields and avenues for nutrient exchange. Their role as primary producers in aquatic ecosystems, coupled with their mesmerizing beauty and scientific significance, make diatoms a true wonder of the natural world. Understanding and appreciating these delicate organisms is crucial to safeguarding the delicate balance of aquatic ecosystems for generations to come.
Classification of Diatoms
Diatoms, those mesmerizing aquatic organisms with their glass-like structures, hold a unique place in the world of classification. As members of the protist kingdom, they are eukaryotic organisms that do not fit squarely into the categories of plants, animals, or fungi. Instead, diatoms find their formal classification under the Division Chrysophyta within the Class Bacillariophyceae, distinguished by the presence of an inorganic cell wall made of hydrated silica.
The Division Chrysophyta showcases several key characteristics that define diatoms within this taxonomic group. Among these traits are endoplasmic cysts, which are specialized compartments within the cell that aid in various cellular functions. Furthermore, diatoms are known to store oils, a distinctive feature that sets them apart from other organisms that primarily store starch for energy reserves. Their unique bipartite cell wall, composed of hydrated silica, plays a crucial role in maintaining their intricate and delicate structures.
One of the most intriguing features of diatoms is their ability to secrete silica, a process that contributes to the formation of their remarkable glass-like cell walls. This secretion of silica not only defines their physical appearance but also plays a vital role in their ecological functions within aquatic ecosystems.
Within the realm of diatom classification, they are further divided into two main Orders: Centrales and Pennales, each with its own distinguishing characteristics.
The Order Centrales, also known as Biddulphiales, is characterized by valve striae that are arranged in relation to a central point, forming elegant and intricate patterns. Additionally, they possess an annulus, a distinct central areola, which adds to their visual allure. Their overall shape is cylindrical, giving them a unique appearance among diatom species.
On the other hand, the Order Pennales, also referred to as Bacillariales, displays valve striae arranged in relation to a single point, resulting in a pen-like appearance. These diatoms are bilaterally symmetrical, showcasing a balanced and symmetrical structure that contributes to their captivating beauty.
Both Centrales and Pennales boast an astonishing array of diatom species, each possessing its own distinct frustule patterns and ecological adaptations. As researchers continue to delve into the world of diatoms, uncovering new species and studying their intricate classification, the significance of these organisms in the aquatic world becomes increasingly apparent.
In conclusion, the classification of diatoms is a captivating journey into the realm of protists, showcasing their uniqueness and ecological importance. As we unravel the intricate characteristics of these remarkable organisms, we gain a deeper appreciation for their place in the natural world. The bipartite cell wall of hydrated silica, the secretion of silica, and the division into Centrales and Pennales all contribute to the mesmerizing diversity and beauty of diatoms, making them a subject of ongoing fascination and scientific exploration.
Diatoms Under a Microscope
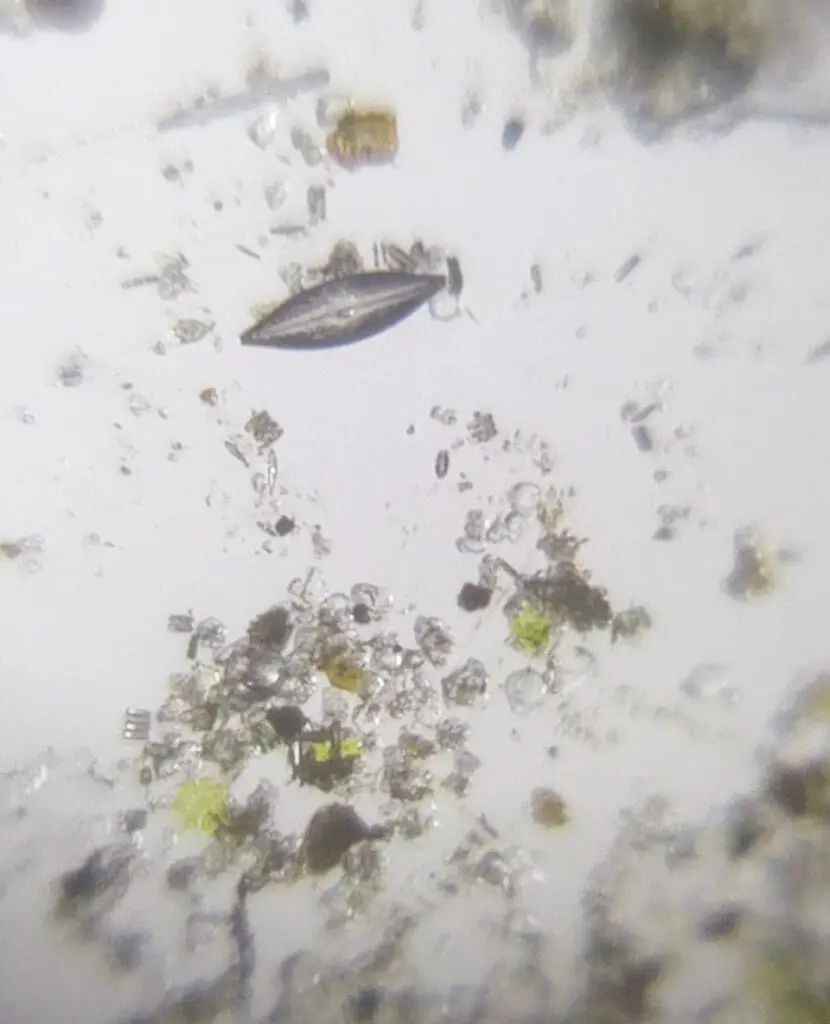
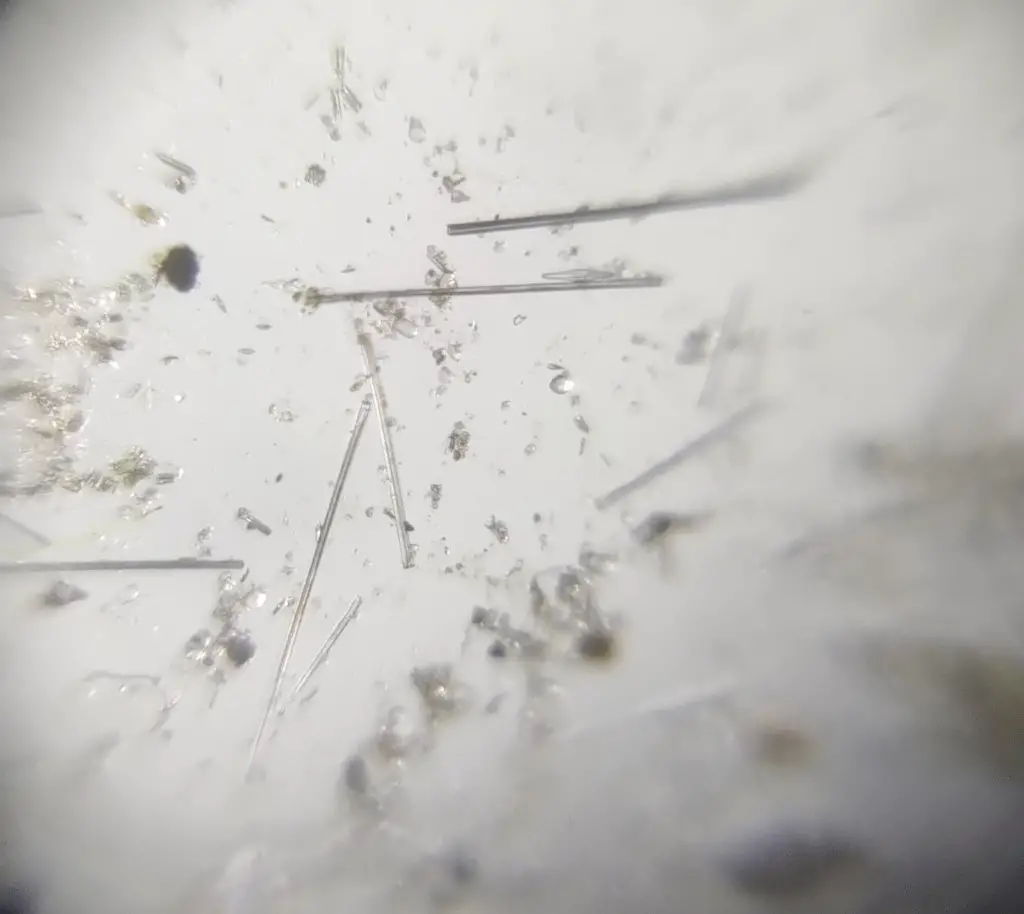
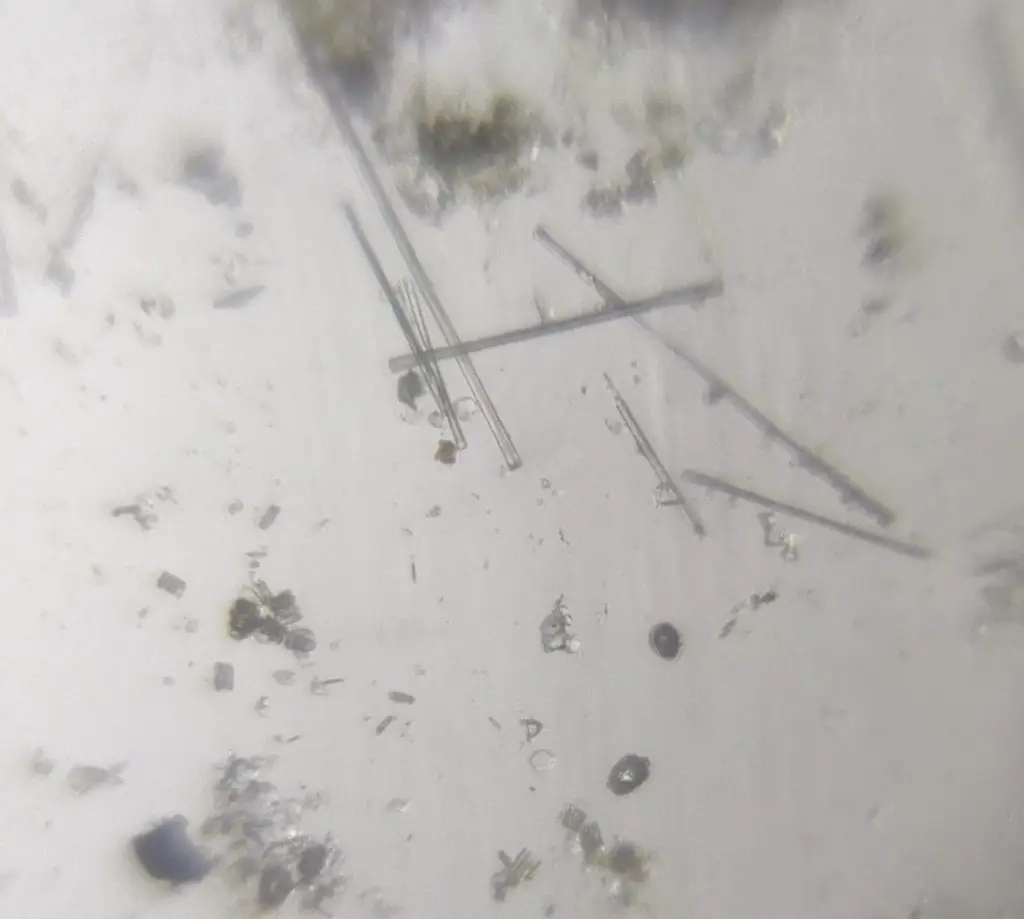
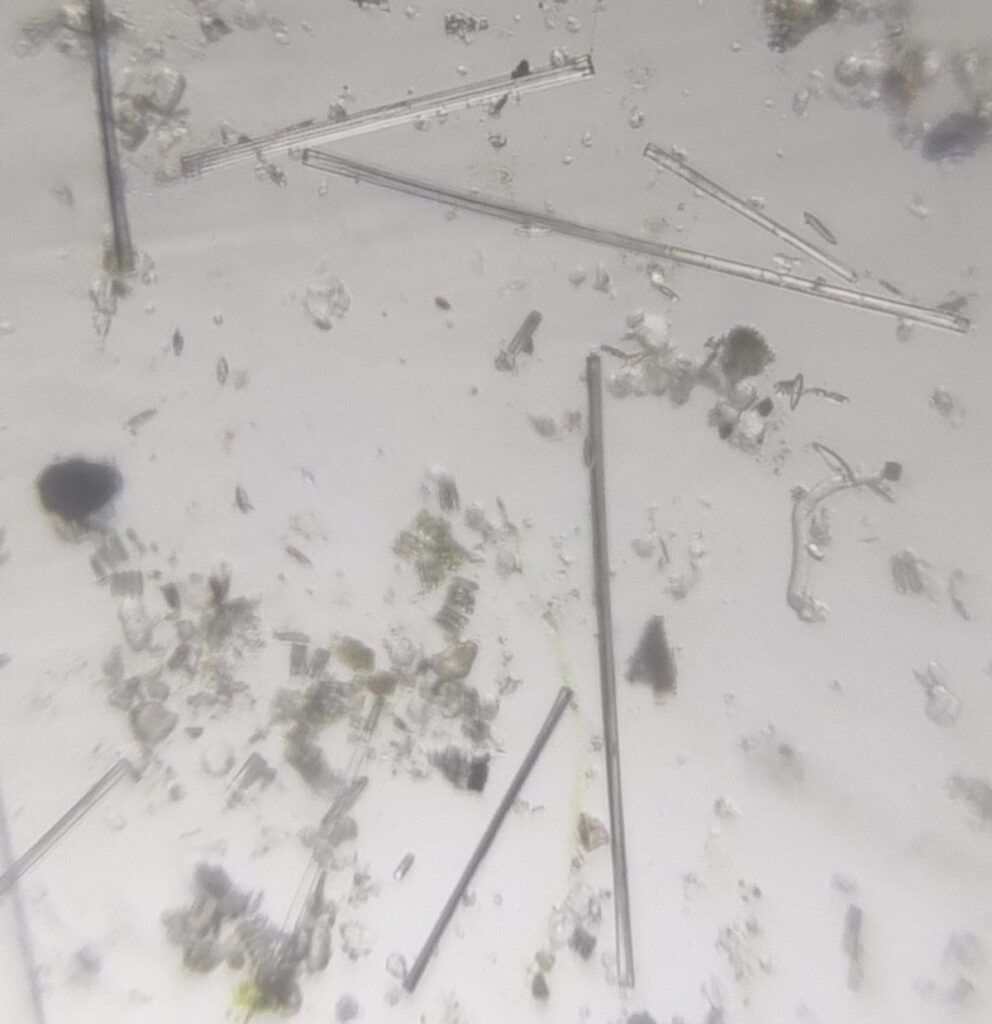
Under the microscope, diatoms are particularly interesting specimens. They have fascinating patterns on their surface with very minute punctures. Fine holes in the frustule of some species are used to assess the resolving capability of a microscope lens.
Requirement
- Centrifuge Tubes: To prepare a concentrated diatom sample, you will need centrifuge tubes. These tubes aid in separating diatoms from the surrounding water, allowing for a more focused and detailed observation.
- Pipettes: Precise and accurate transfer of the diatom sample is facilitated by pipettes. These small but powerful tools enable researchers to extract and manipulate specific volumes of the water sample with ease.
- Fevi kwik (Transparent General Purpose Instant Adhesive): When dealing with delicate diatoms, securing them in place for observation is essential. Fevi kwik, a transparent general-purpose instant adhesive, can be used to attach diatoms to glass slides gently, ensuring they remain undisturbed during the observation process.
- Vanish (or Similar Laundry Bleach/Detergent Additive): Before observation, diatoms need to be properly cleaned and prepared. Vanish or a similar laundry bleach/detergent additive can help remove any impurities or organic matter, providing a clear and unobstructed view of the diatoms’ intricate structures.
- Piece of Strong Thread: To ensure even distribution of the diatom sample within the centrifuge tubes, a piece of strong thread can be used as a simple but effective stirrer. This ensures that the diatoms are evenly dispersed, making them easily accessible for observation.
- Glass Slides and Coverslips: The foundation of any diatom observation is the glass slide. It provides a stable surface for mounting diatoms and facilitates a clear view through the microscope. Coverslips, placed over the diatoms, protect them from external influences while maintaining the necessary focus.
- Water Sample Containing Diatoms: Of course, the heart of the observation lies in the water sample itself. A collection of diatoms, sourced from a suitable aquatic environment, provides the basis for this captivating exploration.
- Patience: Though not a physical requirement, patience is an invaluable virtue when observing diatoms. Achieving the best results often requires time and dedication, as diatoms may reveal their intricate details only to those willing to invest the effort.
Collecting Diatoms
Immersed in the vast expanses of saltwater and freshwater bodies, diatoms, those intriguing microorganisms, lie in abundance, waiting to be discovered by the curious explorer. Captivated by their enigmatic beauty, we embark on the journey of collecting diatoms, unlocking the secrets hidden within these aquatic wonders. Let’s explore the art of collecting diatoms and the thrill of discovering them in their natural habitat.
- Step 1: Choosing the Right Location: To start our quest, we seek out diverse aquatic environments, for diatoms are known to inhabit a wide array of water bodies. A visit to an artificial pond teeming with algae becomes an exciting prospect. Ponds, lakes, rivers, and even coastal areas offer potential diatom-rich grounds for exploration. Remember, each location harbors unique diatom species, making this journey all the more thrilling.
- Step 2: Collecting the Water Sample: With a sense of anticipation, we gently collect a small sample of water from the chosen location. Using a clean container, we carefully scoop up the water, ensuring minimal disturbance to the habitat. While diatoms may be invisible to the naked eye, they undoubtedly form an essential part of this liquid ecosystem.
- Step 3: The Mystery of the Sample: As we gaze into the collected water sample, we remain uncertain about the presence of diatoms. This intrigue only adds to the allure of our expedition. Nature often holds surprises, and diatoms may reveal themselves when least expected.
- Step 4: A Journey of Exploration: For those who seek to venture deeper into the world of diatoms, the internet proves an invaluable resource. Platforms like YouTube offer a wealth of knowledge and guidance through videos on collecting and observing diatoms. Such tutorials can provide valuable insights, ensuring a fruitful and informed exploration.
- Step 5: The Revelation: In this voyage of discovery, patience is indeed a virtue. As we peer through the lens of a microscope and examine the water sample, an extraordinary world comes to life. The intricate beauty of diatoms unfurls before us – transparent frustules adorned with mesmerizing patterns, a testament to their evolutionary brilliance.
- Step 6: Expanding Horizons: As our fascination grows, we may choose to venture into new territories, exploring various locations and collecting water samples to study diatoms from diverse ecosystems. Each new find adds to the tapestry of knowledge, enhancing our understanding of these remarkable organisms.
In conclusion, the art of collecting diatoms is a captivating endeavor that allows us to glimpse into the hidden microcosms of our world. From the thrill of selecting the right location to the excitement of peering through the microscope, each step offers an opportunity to connect with the wonders of nature. Armed with curiosity and a sense of wonder, we venture forth, ready to unveil the beauty and mysteries that lie within these delicate aquatic gems.
Cleaning Diatoms
Cleaning diatoms is a crucial and time-consuming step in the process of preparing these delicate microorganisms for observation. This essential process involves removing impurities from inside the diatom cell and separating the diatoms from other debris. While laboratories use acids and chemicals for this purpose, a simple and effective method involves using a laundry bleach, such as the Vanish brand, which boasts 10 times more oxidizing power than regular detergent – ideal for our needs! However, it is vital to handle bleach with utmost caution, wearing gloves and following safety guidelines.
Let’s walk through the steps of cleaning diatoms using the bleach method:
- Step 1: Preparing the Bleach Solution: In an open container, mix 1/4 teaspoon of the Vanish detergent additive with about 30ml of water. Ensure complete dissolution of the bleach in the water. The quantity of water and bleach used may vary depending on the strength of the bleach. It is crucial to keep this solution in an open container, as gases can build up pressure inside a closed or airtight container due to oxidation.
- Step 2: Obtaining the Sample: Using a pipette, collect a few drops of water from the diatom sample, preferably from the bottom where the diatoms may be concentrated. Some algae and debris may also be present in this sample.
- Step 3: Adding the Bleach Solution: Add 10 – 15 drops of the bleach solution (prepared in Step 1) to the water sample in the centrifuge tube. Allow the solution to settle for approximately 60 minutes. During this process, air bubbles will be generated as the sample gets oxidized. Keep the cap of the centrifuge tube open to avoid gas buildup.
- Step 4: Preparing for Centrifugation: Carefully remove excess liquid from the centrifuge tube using a pipette, leaving behind only a 0.5 cm deep layer of water containing settled debris at the bottom. Afterward, fill half of the tube with clean water.
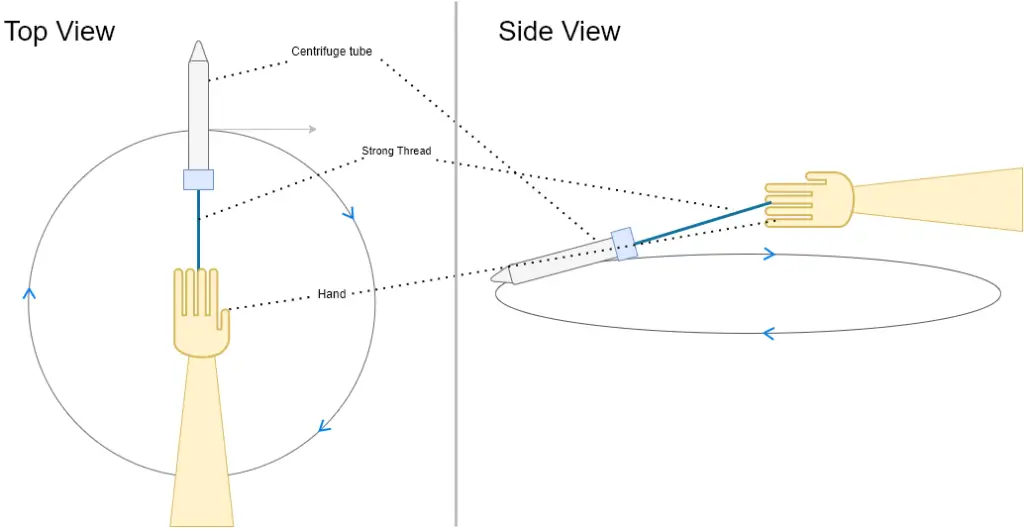
- Step 5: Creating a DIY Centrifuge: Screw the cap back on the centrifuge tube and tightly tie a 30-40 cm long thread just below the cap. This DIY centrifuge will be used to facilitate the separation process.
- Step 6: Centrifuging the Mixture: Hold one end of the thread and start moving the tube in circles in a horizontal plane for about a minute. The thread’s motion will mimic a centrifuge, aiding in the separation of diatoms and debris.
- Step 7: Allowing Settling: Carefully remove the cap of the centrifuge tube and let any gases escape. Rest the tube vertically against a wall for approximately 10 minutes. During this time, matter will settle down to the bottom of the tube.
- Step 8: Washing the Sample: Remove the cap again and cautiously remove excess water using a pipette, while leaving the settled debris intact. Maintain a thin layer of water (approximately 0.5 cm) above the settled matter. Fill the tube with clean water until it is half full. Repeat steps 6, 7, and 8 two more times to thoroughly wash out any remaining bleach or soap.
- Step 9: Finalizing the Cleaning: Remove all excess water, keeping a thin layer of water (around 0.5 cm) above the settled debris. Throughout this process, ensure the tube remains in a vertical position, avoiding any inversion.
Slide Preparation
As we venture deeper into the realm of diatoms, the time has come to create a slide that will allow us to marvel at these intricate microorganisms under the Foldscope. Although slides can be prepared without a mounting medium, we highly recommend using one to protect the delicate diatom frustules from damage during observation. Moreover, certain mounting mediums like Naphrax, Zrax, Pleurax, and Hyrax, while suitable for diatoms, may be challenging to find and potentially release toxic fumes when heated. Instead, we propose using readily available and cost-effective alternatives like ‘Fevi Kwik’ or general-purpose transparent liquid instant adhesives.
Before we proceed, a word of caution: These adhesives can be extremely sticky and may be hard to remove if they come into contact with your skin or fingers. Please exercise caution, read the safety instructions on the adhesive packet, and wear gloves if necessary.
Now, let’s dive into the process of mounting the diatom specimen:
- Step 1: Extracting the Diatom Sample: Using a pipette, take only a couple of drops of water from the very end of the centrifuge tube containing the cleaned diatoms. Be cautious not to take in excess water, as this may affect the slide preparation process. If you accidentally take more water, hold the pipette still in a vertical position for a couple of minutes to allow the excess water to settle.
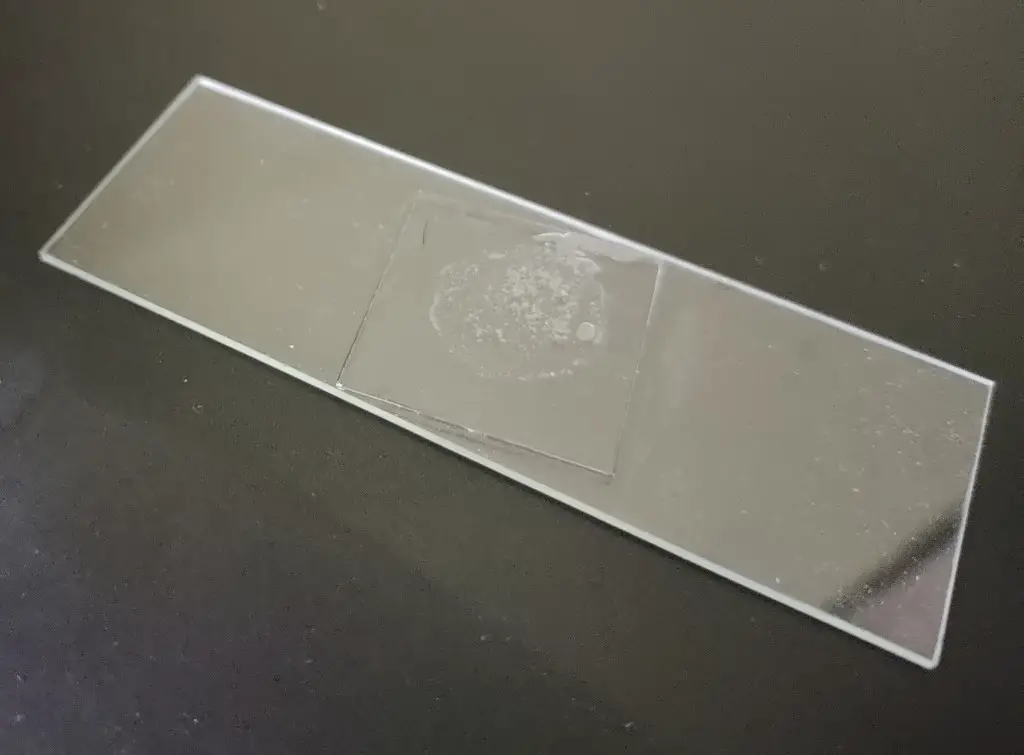
- Step 2: Placing the Water Drop on the Slide: Carefully place a drop of the water sample from the pipette onto the center of an empty glass slide. Use the pipette to spread the drop slightly, covering an area equal to that of a cover slip.
- Step 3: Allowing Drying Time: Let the slide dry for a few minutes. During this time, a white powdery residue containing our precious diatoms will become visible on the slide. If you prefer not to work with adhesives, you can skip steps 4, 5, and 6. Instead, place a cover slip on the white powdery portion, secure the sides with transparent tape, and move to step 7.
- Step 4: Applying the Adhesive: Now, with utmost care, place a drop of adhesive on top of the powdery spot on the slide.
- Step 5: Securing the Cover Slip: Using tongs (recommended) or your fingernails (wearing gloves recommended), pick up the cover slip and place it on the adhesive drop. Immediately tap the center of the coverslip gently using a blunt object.
- Step 6: Ensuring Firm Attachment: Within a couple of seconds, the coverslip will stick to the slide. Be aware that if a mistake occurs, you will have to start over with a new slide and coverslip. To avoid such situations, always save some sample for backup.
- Step 7: A Slide of Wonders: Congratulations! You have skillfully created a slide from your diatom sample. Now, it is time to savor the moment of anticipation and place this exquisite creation under the Foldscope. Behold the awe-inspiring world of diatoms, where intricate patterns and microcosmic marvels await your curious gaze. Enjoy the journey of discovery as you delve into the mesmerizing beauty of these fragile aquatic wonders.
Observing the Slide and Taking Pictures
Having meticulously prepared our diatom slide, the moment of revelation has arrived. Armed with the LED Magnifier attachment for Foldscope, we are ready to embark on an extraordinary visual journey into the microscopic realm. Capturing the intricate details of diatoms requires precision, patience, and proper equipment. Let’s explore the art of viewing the slide and taking captivating pictures of these delicate aquatic wonders.
- Step 1: Setting the Stage: Ensure you have the LED Magnifier attachment for your Foldscope, as proper lighting is essential for illuminating the microscopic wonders. This attachment provides the necessary light source for a clear and well-lit view of the diatoms.
- Step 2: Aligning for Focus: Proper focus is key to capturing the stunning details of diatoms. Take a moment to align your Foldscope and adjust the focus to achieve the sharpest image possible. From personal experience, certain mobile phone cameras may excel at focusing when used with Foldscope, offering enhanced clarity and precision.
- Step 3: Patience and Persistence: As you venture into the microscopic world, be patient and persistent. The beauty of diatoms lies in their intricate patterns and delicate structures, and capturing these wonders requires careful observation and numerous attempts. Take multiple pictures from various angles and positions to ensure you capture the essence of each diatom.
- Step 4: Unleash Your Creativity: Don’t hesitate to explore different compositions and angles. Experiment with lighting and magnification levels to uncover hidden details and unique perspectives. Let your creativity guide you in revealing the unparalleled beauty of diatoms.
- Step 5: Selection and Upload: Once you have captured a variety of images, select the best ones that truly showcase the mesmerizing features of diatoms. These selected images can be uploaded and shared on platforms like Microcosmos, where fellow enthusiasts can marvel at the captivating microcosmic world you have unveiled.
- Step 6: Preserve the Wonder :As you continue your journey of exploring diatoms and other microscopic wonders, remember to preserve the beauty of each slide. Properly store your slides in a safe and dry environment to ensure they remain in pristine condition, ready for future observation and admiration.
In conclusion, viewing the slide and taking pictures of diatoms is an art that combines scientific curiosity with creative expression. Armed with the LED Magnifier attachment for Foldscope, we enter a world where the tiniest organisms become captivating masterpieces. With proper lighting, focus, and the right equipment, we unveil the intricate details of diatoms and allow their enchanting beauty to inspire us. As we share our best images with the community, we contribute to the collective awe and admiration for the microcosmic realm, reminding us of the immense wonders that lie beyond the naked eye. So, let us venture forth and capture the magic of diatoms, preserving their delicate charm for generations to come.
Digestion procedure for both Light microscopy and TEM
Diatoms are relatively robust microorganisms, making them suitable candidates for digestion procedures using both light microscopy and transmission electron microscopy (TEM). Below are the step-by-step guidelines for each method:
Digestion Procedure for Light Microscopy:
- Collect the diatom culture in a suitable centrifuge tube, either glass or plastic (e.g., Falcon™), which can withstand boiling hydrogen peroxide if necessary. An alternative filtration method may be considered if rinsing steps result in excessive damage or significant cell loss.
- Centrifuge 10 mL to 15 mL of the diatom culture for 4 minutes at 3000 to 4000 rpm. Carefully remove the media, and if required, repeat the centrifugation to obtain a pellet of cells.
- Resuspend the cell pellet in distilled water and centrifuge again at 3000 to 4000 rpm for 4 minutes. Repeat this washing step twice to ensure removal of any remaining media.
- Prepare a solution of 1 to 2 mL of hydrogen peroxide (30% w/v) and mix it thoroughly with the resuspended pellet.
- Place the tubes in a rack in a water bath at room temperature and gradually raise the temperature to 80-90°C for 1 to 1.5 hours. Allow the digestion process to proceed.
- After digestion, let the tubes cool down.
- To facilitate centrifugation, add distilled water to the tubes until they reach a volume of approximately 10 mL. Centrifuge again at 3000 to 4000 rpm for 4 minutes. Carefully remove the acid, as the cells may not pellet as effectively due to their “colorless” nature.
- At this stage, it is advisable to take a small drop of the sample and observe it under a microscope to assess the efficiency of the oxidative step and get an indication of the diatom density.
- Rinse the pellet twice with distilled water, centrifuging each time to ensure any residual acid is removed.
- Finally, remove the pellet from the centrifuge tube and place it in about 1 mL of distilled water in a clean 1.5 mL Eppendorf tube. Label the tube for identification.
Digestion Procedure for Transmission Electron Microscopy (TEM):
The digestion procedure for TEM is similar to the light microscopy method, with a few differences:
- Begin by collecting the diatom culture in a suitable centrifuge tube (glass or plastic) as described before.
- Centrifuge 10 mL to 15 mL of the diatom culture for 4 minutes at 3000 to 4000 rpm. Remove the media, and if needed, repeat the centrifugation to obtain a pellet of cells.
- Resuspend the cell pellet in distilled water and centrifuge again at 3000 to 4000 rpm for 4 minutes. Repeat this washing step twice to ensure removal of any remaining media.
- Prepare a solution of 1 to 2 mL of hydrogen peroxide (30% w/v) and mix it thoroughly with the resuspended pellet.
- Place the tubes in a rack in a water bath or a large volume beaker with distilled water on a hotplate. Gradually increase the temperature to 80-90°C for 1 to 1.5 hours. Allow the digestion process to occur.
- After digestion, let the tubes cool down.
- Fill the tubes to approximately 10 mL with distilled water. Centrifuge again at 3000 to 4000 rpm for 4 minutes. Be cautious as the cells may not pellet as effectively due to their “colorless” nature, requiring more care to prevent removing too many cells.
- At this stage, take a small drop of the sample and observe it under the microscope to evaluate the efficiency of the oxidative step and get an indication of the diatom density.
- Rinse the pellet twice with distilled water, centrifuging each time to ensure any residual acid is removed.
- Remove the pellet and transfer it to about 1 mL of distilled water in a clean 1.5 mL Eppendorf tube. Label the tube accordingly. Note that further concentration or dilution may be required based on experience to achieve an optimal density of cells on either the microscope slide or formvar coated grids. The samples should ideally have a suspension of fine particles when held up to the light, neither milky nor totally clear.
In conclusion, the digestion procedure for both light microscopy and TEM involves several steps to ensure the proper preparation of diatom samples for observation under these respective microscopy techniques. By following these guidelines, researchers can obtain reliable and informative results when studying diatoms and their intricate structures.
Digestion Procedure for Light Microscopy of Diatom Samples
To ensure accurate and clear observations under light microscopy, it is crucial to follow a meticulous digestion procedure. Below are the step-by-step guidelines for preparing diatom samples for light microscopy:
Equipment and Environment Setup:
- Work in a controlled environment free from dust and air currents to minimize contamination.
- Ensure that all glass slides and coverslips are thoroughly cleaned before mounting the samples to avoid artifacts in the observations.
- Assemble the required equipment, including preplugged pasteur pipettes, glass slides, round coverslips with a diameter of 13-19 mm, forceps, a settling tray or container, Naphrax (a mounting medium), and a hotplate.
Sample Preparation:
- Begin by preparing the mixed suspension of diatoms to be examined. Place up to 0.5 mL of the suspension onto each coverslip, ensuring even distribution.
- Cover the diatoms with a clean coverslip, and allow the samples to sit undisturbed for up to two days. This gentle and gradual settling process will provide an even and comprehensive coverage of the diatoms.
Alternatively, if time is limited, the coverslip samples can be settled for 15-30 minutes and then dried more rapidly using very low heat on a hotplate. Keep in mind that this method may yield lower quality slides but is still acceptable for qualitative analysis.
Naphrax Application:
- Heat a hotplate in a fume hood to 130°C to prepare it for the subsequent steps.
- On a clean glass slide, place one drop of Naphrax, which serves as the mounting medium for the diatoms.
- Using forceps, carefully invert the coverslip with the dried diatoms over the drop of Naphrax on the glass slide.
- Heat the slide on the hotplate at 130°C for 15 minutes. This step helps to drive off the toluene in the Naphrax, ensuring proper mounting and preservation of the diatoms.
- Allow the slide to cool down after heating to prevent any damage to the samples.
- Use a fingertip or forceps to ensure that the coverslip is securely fixed in place and does not move. If there is any movement, the slide will need to be heated for a longer duration to achieve proper mounting.
By following this digestion procedure for light microscopy, researchers can obtain well-prepared diatom samples that are suitable for high-quality observations under a light microscope. Proper mounting and sample preparation are essential to ensure accurate and reliable results in the study of these fascinating microorganisms.
For Transmission Electron Microscopy (TEM) of Diatom Samples
To prepare diatom samples for observation under a transmission electron microscope (TEM), a precise and systematic digestion procedure is essential. The following step-by-step guidelines outline the process:
Centrifugation and Cell Check:
- Begin by centrifuging the Eppendorf tube containing the diatom sample to remove most of the water. This step helps concentrate the cells at the bottom of the tube.
- Take a small drop of the water/cells and place it onto a microscope slide. Examine the slide under a light microscope to verify the presence of cells in the tube and to ensure that sufficient cells are still present after rinsing steps.
- Before loading the samples onto grids, re-centrifuge the tubes to collect and pellet the cells at the bottom of the Eppendorf tubes once again.
Loading Grids:
- Ensure that the formvar film on the grids is completely dry before proceeding. It is advisable to check the quality of the formvar-coated grids under a light microscope before use to avoid issues during TEM imaging. Commercially available formvar-coated grids are an option, or they can be prepared as detailed below.
- Add a small drop of the diatom cell suspension onto the formvar-coated grid and let it sit for a few minutes to allow the cells to settle.
- Carefully draw off the excess water using “points” of filter paper. These points can be created by cutting the filter paper into small triangles to facilitate the water removal without disturbing the cells.
- Re-examine the grid under the light microscope to ensure the presence of cells and the quality of the preparation. This step is critical to avoid wasting time and resources on faulty or empty grids during the TEM imaging process.
Preparing Formvar Coated Grids:
- Mix formvar powder in 1-2 dichloroethylene to create a solution with a concentration of 0.3 to 0.8% (typically 0.6%).
- Work in a dust-free environment to maintain the quality of the formvar-coated grids.
- Over a beaker, pour the formvar solution down the face of a glass microscope slide. The formvar will set quickly.
- Use a scalpel to trim around the edges of the formvar film. Then, place the slide at an angle into a basin of MilliQ water to float the formvar off the slide.
- Using forceps, place the grids onto the formvar film and remove the film from the water by overlaying it with a section of Parafilm backing paper (not the Parafilm itself).
- Transfer the grid-laden paper to a clean storage container (e.g., a Petri dish) for later use.
In summary, the digestion procedure for TEM involves proper centrifugation, careful examination of samples under a light microscope, and appropriate loading of diatom cell suspensions onto formvar-coated grids. The method for preparing formvar-coated grids is also described to ensure reliable and high-quality TEM observations. Following these guidelines will help researchers obtain valuable insights into the detailed structures of diatoms using transmission electron microscopy.
FAQ
What are diatoms, and why are they fascinating to observe under the microscope?
Diatoms are single-celled, photosynthetic organisms belonging to the algae group. They are characterized by their intricate glass-like cell walls made of hydrated silica. Observing diatoms under the microscope is fascinating because of their stunning and diverse frustule patterns, which showcase their unique beauty and ecological significance.
How can I collect diatoms for observation under the microscope?
Diatoms can be collected from various aquatic environments like ponds, lakes, rivers, and coastal areas. Using a simple water sample and a centrifuge, you can concentrate the diatoms for observation.
What equipment do I need to observe diatoms under the microscope?
For diatom observation, you’ll need a microscope with suitable magnification capabilities, glass slides, coverslips, pipettes, and a centrifuge. Additionally, using the LED Magnifier attachment for the Foldscope enhances illumination during observation.
Can I use regular microscope slides and coverslips for diatom observation?
Yes, you can use standard glass slides and coverslips for diatom observation. However, it’s essential to ensure they are clean and free from any contaminants that could interfere with the observation.
How do I properly clean diatoms for observation?
Cleaning diatoms involves using a laundry bleach like Vanish to remove impurities and separate diatoms from debris. Careful handling of bleach and ensuring a thorough washing process are crucial for successful cleaning.
Can I use a mounting medium for diatom slides, and if so, which one is recommended?
While you can use high refractive index mounting mediums like Naphrax or Pleurax, they may be challenging to find and potentially release toxic fumes when heated. Instead, using readily available and cost-effective alternatives like ‘Fevi Kwik’ or general-purpose transparent liquid instant adhesives is recommended.
What precautions should I take when using adhesives for mounting diatoms?
Adhesives can be extremely sticky and may be hard to remove if they come into contact with your skin or fingers. Always read safety instructions on the adhesive packet, consider wearing gloves, and work precisely during slide preparation to avoid mistakes.
How can I ensure proper lighting and focus for capturing diatom details in pictures?
Using the LED Magnifier attachment for Foldscope provides the necessary lighting for well-lit diatom observation. Additionally, aligning and adjusting the focus carefully will ensure sharp and detailed images.
Which mobile phone cameras work best with Foldscope for capturing diatom pictures?
From personal experience, some mobile phone cameras may excel at focusing when used with Foldscope compared to others. Experimenting with different camera settings and devices can help you find the best one for your diatom photography.
How can I share my diatom images with others?
You can share your captivating diatom images on platforms like Microcosmos, where fellow enthusiasts and researchers can marvel at your discoveries. Sharing your observations contributes to a broader understanding and appreciation of these exquisite microorganisms.


